
Understanding the intricacies of painting auto parts is essential for business owners looking to enhance the quality and durability of their automotive products. Painting not only improves aesthetics but also protects components from environmental conditions and wear. This comprehensive guide will delve into the critical aspects of the painting process, starting with surface preparation, including effective cleaning and sanding techniques. We will explore masking methods that ensure precision and cleanliness, followed by the application of primer for optimal adhesion and base coverage. Finally, we will cover the final touches in paint application for a flawless finish. Each chapter builds upon the last, providing a holistic view of how to achieve professional results that can elevate your business.
The Silent Foundation: Mastering Surface Cleaning and Sanding for Durable Auto-Parts Painting

A flawless paint finish on auto parts begins long before the color is mixed or sprayed. It starts with a meticulous, disciplined approach to cleaning and sanding that creates a surface the paint can truly bond to. Skipping or rushing this stage invites adhesion failures, micro-scratches that telegraph through the color, and finishes that age poorly under heat, sun, and road grime. When you treat surface preparation as a critical, inward-focused practice rather than a mere prelude, you set the entire project on a trajectory toward durability, gloss, and longevity. The goal is not merely to remove dirt; it is to create a surface with the right texture, free of contaminants, that invites the primer to grip with tenacity and the topcoat to lay down as a smooth, even field rather than a wrinkled, chipped layer. The steps that follow are both practical and precise, and they align with industry-tested methods that balance efficiency with the insistence on cleanliness. In practice, preparation commands attention to detail that most beginners overlook, and the payoff is a finish that resists peeling, fading, and micro-spotting for years.
Surface cleaning begins with a deliberate sequence rather than a single wash. Start by washing the part with a degreasing car soap and rinsing thoroughly to strip away oil, wax, dust, and surface debris. This is not a cosmetic rinse; it is an active removal of residues that can hide in tiny pores or pores of molded plastic. A lint-free towel then dries the surface completely, preventing a new film of moisture from trapping dust. With the surface dry, move to a dedicated de-waxing solvent—often isopropyl alcohol or a specially formulated pre-paint cleaner. The solvent dissolves and carries away residues that soap alone cannot remove. A final wipe with a tack cloth completes the cleaning by lifting the last suspended particles from the surface. The tack cloth is wax- and chemical-resistant, designed to hold dust without redepositing it onto the part. In a well-controlled shop, this stage is performed with minimal air movement, and the work is done on a clean, dry, stable surface where a single speck of dust cannot drift in and ruin the finish. This careful sequence is not a mere ritual; it is the practical embodiment of good adhesion science, which shows up as fewer paint defects and a more robust bond between layers.
The preparation extends beyond metal to plastics and composite components commonly found on modern vehicles. For metal parts, the emphasis remains on removing oils and residues, but plastics demand an extra layer of consideration. A primer, or an adhesion promoter designed specifically for plastics, is often recommended before any sanding and painting. This promoter helps bridging agents grip the otherwise slick polymer surface and provides a better platform for primer and topcoat adhesion. If you work with polypropylene or other high-absorbency plastics, the promoter becomes even more critical. The principle—pre-wetting the surface to improve bonding and ensure uniform adhesion—still holds. When plastics are involved, the plan usually includes cleaning, adhesion promoter application, and a focused sanding sequence to create the micro-texture that paint loves. The result is a finish that does not flake or peel as the part flexes and ages.
Cleaning and prep are not just about removing grime; they are also about creating a predictable finishing environment. The environmental conditions you choose—temperature and humidity—substantially influence cure behavior and the final appearance. In many settings, a temperature window of roughly 20–25°C with humidity around 50–70% provides predictable drying and reduces problems such as whitening, grainy texture, or poor edge adhesion. These conditions matter for primer as well as topcoat. Within that window, the time between steps is not a guess; it is a carefully observed interval that ensures solvent evaporation is complete and the surface is ready to accept the next layer without trapping solvents beneath the surface. In this context, even the sequence of sanding grits becomes strategic, not arbitrary.
The sanding phase translates the cleanliness into a surface texture that the coating system can wet out and lock onto. Start with coarser grits, typically in the 80–120 range, to remove old paint, rust, and obvious imperfections. This stage is not about achieving final polish; it is about creating a uniform profile that reduces edge lines and makes the subsequent layers lay down evenly. If the part has dents, this is the moment to apply body filler and allow it to cure fully before moving on. Once cured, a careful sanding with 180-grit paper smooths the filler and begins to blend it with the surrounding area. The goal at this stage is to eliminate gouges and feather the repairs so the transition from repaired area to original surface is barely perceptible to the eye and touch.
Progressively finer sanding follows, a key transition from repair to finish readiness. Move to 220–320 grit to refine the surface further and minimize the micro-scratches left by the coarser papers. For high-visibility parts or those with complex geometry, wet-sanding with 800-grit or finer paper can dramatically reduce dust and produce a near-mirror feel on the substrate. Wet sanding has the dual benefit of cooling the surface and preventing the dust from becoming airborne, which is especially helpful when working on large panels or body components with complex contours. After each stage, wipe the surface with a tack cloth again. The discipline of repeating dust removal after every sanding step cannot be overstated, because residual dust trapped in the next film will telegraph through the final finish and undermine even the most diligently mixed paint.
Between the mechanical prep and the physical cleanliness, there is a mindset to adopt: treat each surface as if it will determine the future of the project. The professionals who get repeatably excellent results insist that more than 80% of a perfect paint job is finished long before the first drop touches the panel. The line is memorable because it captures the reality that adhesion and appearance are the sum of surface purity, texture, and the careful sequencing of steps. It also explains why the preparation is not optional; it is the core around which the entire painting process orbits. With this perspective, you begin to see why every lint-free cloth, every controlled wipe, and every properly chosen grit matters. It is easy to underestimate the cost of an extra hour spent cleaning or sanding, yet that one hour can save you hours of trouble later and yield a finish that lasts.
In practice, you might encounter a bumper or a plastic trim piece that requires additional attention. A note of caution for plastics is prudent: if the piece will flex under heat or stress during curing, you might schedule a slightly longer bake window or choose a flexible primer capable of accommodating those movements without cracking. The aim remains the same—a surface ready to accept a uniform primer that will anchor the topcoat without peeling. For those who intend to work with a bumper or a panel that has curved geometry or tight corners, consider how the sanding plan will apply across the curvature. The texture should be uniform everywhere, which often means paying attention to the edges and corners where the surface tends to collect dust or where the original finish has a different texture.
As you progress toward masking and priming, the value of the preparation continues to surface. A properly cleaned and sanded surface reduces the likelihood of whitening and other topcoat defects. It is worth noting a practical tip from experienced technicians: test your method on a scrap panel before committing to your project, especially when mixing primers or trying a new solvent or promoter. A small test panel helps confirm that the chosen sequence yields the expected bond strength and aesthetic result before you apply the approach to a critical component. This practice, though it may appear prudent rather than essential, pays off when the pièce de résistance is the visual alignment of color and gloss across the part family you are painting.
For readers who are assembling a multi-part project—a bumper, a hood, and a set of fenders—the link between prep steps across different substrates becomes important. A well-prepared bumper, using an adhesion promoter for plastics and a thorough sanding schedule to create the necessary micro-roughness, will behave consistently with metal parts that have been similarly prepared. The outcome is a harmonious finish across disparate components, a result that demonstrates technical discipline and careful attention to the transfer of paint from the gun to the part. If you need a concrete reference in practice, you can explore a real-world example that walks through bumper preparation and related components: there is an in-depth resource that discusses the practical steps of prepping a bumper along with other panels for a paint system, offering a grounded, automotive-part-focused perspective that aligns with this chapter’s emphasis on preparation as foundation.
The journey through surface cleaning and sanding is ultimately about control and predictability. You control what the surface starts as, and you predict how it will interact with primers and color coats. You reduce variables, limit surprises, and set the stage for a uniform, durable finish. The narrative ties directly into the next phase—masking and priming—where precision continues to matter, and the foundation laid by clean, well-textured surfaces becomes visible in the crisp lines, consistent adhesion, and lasting sheen that follow. When you commit to this level of preparation, you will notice the difference in how the paint flows, how it settles into corners and edges, and how much easier it is to achieve a flawless, showroom-ready appearance across all treated parts.
For those exploring options to consult a broader, part-specific reference, a relevant internal product guide offers additional context on how certain bumper assemblies are prepared and treated before finishing. For example, one may consult a detailed product page that outlines bumper components and compatibility in the context of overall vehicle aesthetics and paint readiness. This internal reference provides a practical complement to the principles discussed here, reinforcing the idea that effective preparation is not just about one part but about an integrated approach to the entire assembly.
External resources can also provide broader insights into technique and best practices. A well-regarded external guide compiles step-by-step recommendations for achieving flawless results through careful surface preparation and controlled application. While the specific tools and brands may vary, the underlying principles of cleanliness, appropriate material choice, and patient, staged execution remain constant. The emphasis on testing your mixtures on scrap panels and maintaining a dust-free environment aligns with the guidance shared in professional tutorials and educational materials dedicated to car refinishing. External readers may find that resource complements the approach described here, offering a practical perspective from seasoned technicians who routinely translate theory into repeatable, on-the-spot results.
In sum, the preparation stage is the quiet backbone of any auto-parts paint project. It demands a disciplined sequence, a clean workspace, and a thoughtful approach to both substrate and finish. By foregrounding cleaning, dust control, appropriate substrate-specific tactics, and a staged sanding plan, you build a robust platform for primer, color, and clear coat to perform as designed. The results are not only about looking good in a shop light; they are about lasting, durable adhesion that resists cracking, peeling, and wear while delivering the kind of smooth, uniform appearance that makes a repair or refinishing job indistinguishable from factory quality. As you move forward, keep the focus on purity of surface and consistency of texture, and the rest will follow with greater ease and reliability.
- Internal link reference for further practical context: 03-06-mitsubishi-evolution-8-9-jdm-rear-bumper-oem.
External resource for expanded technique and validation: https://www.autorepairtutorials.com/how-to-spray-paint-a-car-like-a-pro/
Masking Mastery: Framing Precision for Flawless Auto-Part Painting
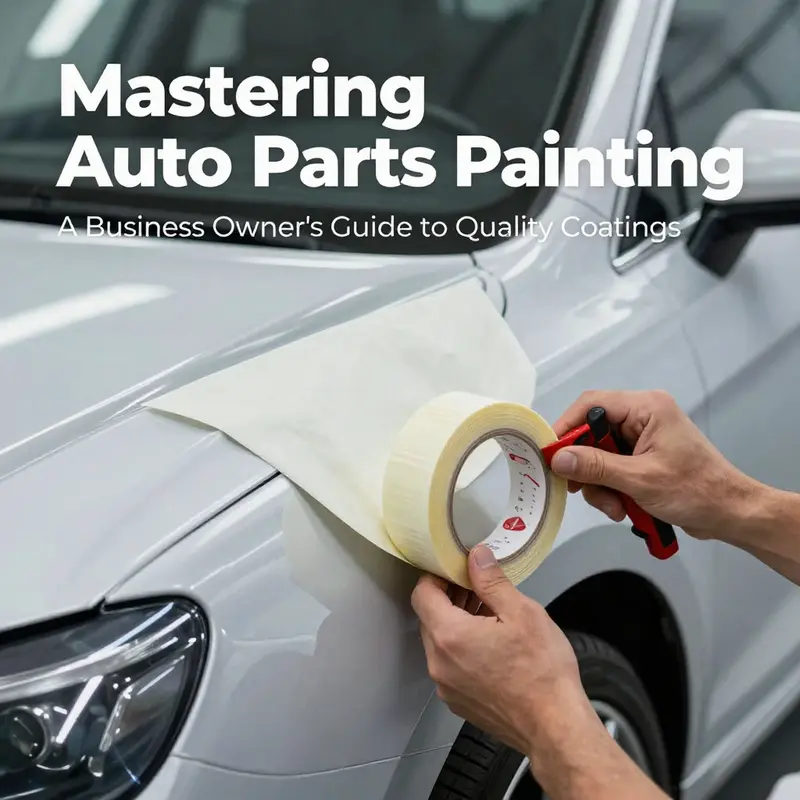
Masking is the quiet architect of any successful paint job on auto parts. It sits at the threshold between the raw, clean surface and the final, seamless finish. Without meticulous masking, even the finest color, the most even clear coat, can be compromised by overspray, ragged edges, or paint bleed into areas that should remain unpainted. Skilled masking turns a potentially chaotic spray session into an orderly, controlled process, allowing lines to stay sharp, contours to retain their shape, and the entire panel to read as a single, cohesive piece. In this chapter, we explore masking not as a preliminary afterthought but as a core discipline that sustains durability, aesthetics, and efficiency across the multi-step journey from surface preparation to finishing polish. The goal is not just to protect what you don’t want painted, but to position every edge, curve, and transition for the most durable adhesion and the cleanest visual result when color and clear coat finally settle over the part.\n\nGreat masking begins with deliberate material selection. The right masking tape is more than a sticky strip; it is a tool engineered to resist lifted edges, temperature shifts, and chemical interactions with primers and paints. Automotive masking tapes come in a spectrum of performance grades, and choosing the correct grade is essential for both metal and plastic substrates. For large, flat areas or complex shapes, specialized masking films provide a surface that can be laid smooth and held securely in place, even when the part must endure extended exposure to heat during curing. Heat resistance matters because many automotive paints undergo baking or accelerated curing in professional settings. Films that tolerate higher temperatures reduce the risk of shrinking, wrinkling, or shifting during cure. The most effective masking solutions also feature properties that minimize air pockets and ensure uniform contact with the part’s surface. In practical terms, this combination translates into crisper edges, fewer touch-ups, and a more predictable overall result.\n\nMasking the delicate and highly contoured regions demands a nuanced approach. Grooves, recessed gaps, and the junctions around mirrors or trim pieces present challenges that straightforward tape alone cannot meet. In these areas, masking paper often proves more adaptable than tape because it can conform to irregular contours without lifting. Paper can be layered and folded to create precise cut lines at the boundary between areas to be painted and areas to be protected. Where edges are particularly sharp or delicate, a strip of tape applied to the edge of the masking paper can act as a guard, preventing paint from creeping under the paper and onto adjacent surfaces. The collaboration between film, tape, and paper—used in just the right combination—becomes a choreography that keeps the design intent intact while protecting the surrounding components. For large, radiused surfaces or multi-faceted shapes, the mask should be laid down with a methodical approach: press from the center outward to avoid air pockets, smooth with a soft squeegee or finger to ensure full contact, and recheck the boundary lines under good lighting before the color goes on.\n\nThe performance of masking tapes is defined by more than their adhesive strength. Temperature resistance, surface compatibility, and clean removal behavior all influence whether masking will hold through cure without lifting edges or leaving adhesive residues that mar the finish. When masking is done correctly, the tape adheres strongly enough to prevent bleed and edge lift during the spray, yet it releases cleanly after curing, leaving no sticky residue that could interfere with the next layer or the final polish. High-performance tapes are designed to maintain their hold through a range of conditions, including extended oven exposure in some industrial settings, which means they resist shrinking and curling that can ruin a straight line. A well-chosen tape will also provide adequate masking for time-sensitive workflows; it should be easy to apply, easy to remove, and predictable in performance under the specific curing cycle you are employing. In practice, the right tape choice reduces rework, preserves the integrity of the substrate, and keeps the line between color and shielded areas razor-sharp.\n\nStandards and disciplined practice underpin reliable masking across professional and DIY projects alike. Following standardized processes helps ensure that masking is not a rushed step but a deliberate stage that aligns with surface preparation, primer adhesion, and the subsequent color and clear coats. This alignment matters especially for plastic components, where surface chemistry can complicate adhesion and postsurface reactivity can lead to micro-misshapenness if the lines are not defined with precision. In professional workflows, masking is increasingly integrated with environmental controls and quality checks. Consistent masking practices support predictable drying times, help maintain dust-free environments, and minimize edge contamination during the transition from primer to topcoat. The result is a finish that resists feathering, bleed, and edge chipping, even after months of exposure to sun, heat, and road chemicals. In addition, standardized masking practices reduce cleanup time and worker fatigue, which in turn improves overall project throughput without sacrificing quality.\n\nAn effective masking strategy also considers the interaction between masking materials and the substrates themselves. For metal surfaces, masking must resist lifting due to solvent exposure and slight edge lift caused by primer outgassing. The edge that remains protected must be clear, which means the boundary lines should be executed with care. For plastics, masking films and tapes should be compatible with primer types designed for plastics, because plastics can behave differently under heat and solvent exposure than metals. The masking approach should account for the possibility of thermal expansion during cure; the mask must stay in place and conform to surface movements without curling or peeling. These considerations are particularly important when masking around edges and recesses that will receive a dedicated topcoat or color shade. The art lies in translating the plan into a physical mask that remains stable under the spray’s velocity and temperature, while providing clean, repeatable edges that replicate the intended design.\n\nIn practical terms, masking for auto-part painting often begins with a clean, dust-free environment and a pre-inspection of every surface to be protected. A light tack on surfaces to be masked can help tapes and films seat more securely, but care must be taken not to mar freshly exposed paint or primer. The mask should be aligned with a clear boundary using test lines or brief mockups on a scrap panel. Where large mirror-lines or trim elements intersect with painting zones, masking should extend slightly beyond the intended boundary to accommodate spray drift and ensure a crisp edge once the masking is removed. When multiple layers are involved, such as a color coat followed by a clear coat, consider masking strategies that preserve the edge between color and clear areas, so the final finish reads with defined, professional lines rather than soft, fuzzy boundaries. And as with any step in the painting sequence, documenting and reviewing the masking plan before you start can forestall missteps and save time during cleanup.\n\nTo connect the masking discipline to real-world practice, consider how a masking plan might be executed on a vehicle component that presents both large, flat surfaces and tightly curved sections. A bumper assembly, for instance, benefits from heat-resistant masking film that can cover the broad plane while a tailored combination of tape and masking paper handles the edges where the paint line must remain pristine. For such a project, you might rely on a dedicated masking film for the expansive areas and paper for the contours, attaching the film with a gentle, steady pressure to avoid air pockets and ensuring the boundary lines remain clearly defined. The same principle applies to smaller parts such as grills, trim plates, or mirrors, where precise masking preserves the look of the final finish while protecting the structural integrity of the component. In all cases, the masking step should feel deliberate, not rushed; the mask’s line should guide the eye and define the boundaries that the spray will fill.\n\nFrom a workflow perspective, the masking stage interacts with every downstream operation. It influences paint flow and edge control, and it contributes to overall efficiency by reducing the need for touch-ups after color laydown. The higher the precision of the masking, the fewer compromised edges you will have to correct later. This quality ripple effect is especially important in a busy shop or a long-term DIY project where consistency across multiple parts matters. A masked surface should clearly reveal the intended line of paint, and a well-seated mask should protect areas from overspray while not interfering with the natural surface texture where adhesion and finish are critical. When you remove the mask, the line should reveal itself with crispness, the edges sharp and ready for the next step in curing and finishing.\n\nTo tie the discussion back to the broader art and science of painting auto parts, masking is the bridge between preparation and performance. It protects the integrity of the substrate, preserves the alignment of color with design, and directly influences the final gloss, depth, and color stability. A masking plan that is thoughtful, adaptable, and standards-driven pays dividends in both aesthetics and durability. For those who want to explore deeper practical guidance, the masking techniques discussed here align with a wide range of best practices in automotive finishing. For large, complex applications, the combination of heat-resistant films and adaptable papers becomes essential, enabling painters to cover broad areas efficiently while maintaining attention to the most intricate boundaries. The end result is not just a pristine line but a durable bond between the substrate and the coating—one that resists peeling, chipping, and color bleed under demanding conditions.\n\nAs you reflect on the masking stage, remember that the quality of your finish begins long before the spray gun touches the surface. It begins with choosing the right materials, planning for the geometry of the part, and executing each boundary with patience and precision. It continues through the subsequent primer, color, and clear coats, all the while maintaining the discipline to protect what should remain unpainted. In a field where appearance meets engineering, masking is the quiet craft that keeps the final image true to the original design, no matter how challenging the shape or how long the project lasts. The careful reader can translate this approach to any auto-part painting task, from a bumper to a trim piece, ensuring that each line remains true and each surface reveals the intended color with the integrity of a professional finish.\n\nFor those who want to see a concrete example of how masking supports large-area applications, consider how masking strategies are applied to bumper assemblies and grilles during a typical refinish cycle. The same principles apply whether you are masking a high-volume production part or a DIY project on a single component. In both cases, the emphasis is on selecting the right combination of masking tape, masking film, and masking paper, applying and securing them with attention to contour and boundary, and preparing for a clean removal after curing. When done well, masking becomes a seamless prelude to a flawless color jacket and a glossy, durable finish that can withstand the sun, the road, and the test of time. To deepen your understanding of masking solutions and to see real-world application guidance, you can explore further resources such as the Automotive Paint Masking Solutions Guide on Scribd. It offers step-by-step instructions and visuals that complement the principles outlined here. Automotive Paint Masking Solutions Guide – Scribd and for a practical example of bumper masking in a related project, you can refer to the front bumper page dedicated to a Mitsubishi Outlander model. This internal reference demonstrates how masking decisions translate to part-specific outcomes, reinforcing the idea that precise masking is the foundation of any successful paint job. front-bumper-mitsubishi-outlander-19.
The Quiet Foundation: Mastering Primer as the Bridge Between Substrate and Finished Color

Primer is the often unseen anchor of any auto part paint system. It does not simply fill or smooth; it creates a reliable, uniform platform that makes the final color coat possible to achieve and endure. In practical terms, primer bonds to the substrate—whether metal or plastic—while offering a stable surface for the topcoat to bite into. It blocks corrosion, softens minor surface imperfections, and reduces the risk that adhesion will fail under heat, vibration, or exposure to the elements. When you approach primer with the same care you give to the topcoat, you set the stage for a finish that resists fading, chipping, and wear. This chapter digs into why primer matters so much, how different primer systems work, and how the method of application—electrocoating, spray, or powder—can shape the long-term performance of auto parts in ways that are as important as the color you choose.
The substrate itself governs much of the primer strategy. Metal surfaces lean toward primers that deliver excellent barrier properties and adhesion through a robust chemical bond. On plastics, especially common automotive polymers like polypropylene, primer chemistry must overcome surface energy challenges and flexing during use. For plastics, primers labeled as adhesion promoters or flexible primers are often chosen. These are designed to stay attached when the part is under stress from temperature changes, road flex, and impacts. Even tiny contaminants can undermine adhesion, so thorough surface preparation remains nonnegotiable. Degreasing, wiping with a clean solvent, and careful inspection for oil, wax, or mold release agents are essential first steps before any primer touches the surface. This is not merely a matter of aesthetics; it is a critical determinant of the long-term integrity of the entire coating system.
Once the surface is clean, the choice of primer comes into sharper focus. There are three common routes for applying primer in automotive contexts, each with distinct benefits and constraints. The first is an electrocoating process, or e-coat. In mass production, parts are immersed in a bath of primer and an electric current is passed through the component to drive the primer onto all surfaces, including crevices and complex geometries. The result is a uniform, highly adherent film that provides excellent corrosion resistance, especially on metal substrates. E-coats excel when parts demand consistent coverage in hard-to-reach areas, and they help protect every detail from the first day of service. While traditional e-coat systems are tightly integrated into factory lines, modern iterations extend their efficiency to high-precision, high-throughput environments where consistency is paramount.
A second, closely related route is the spray application of primer. In this approach, primer is atomized, then charged with electrostatic energy so it is attracted to the grounded part. This technique delivers a smooth, even film with minimal waste and relatively quick cycle times. Thorough surface preparation remains foundational here because any lingering oil film or dust can mar the finish, blocking the intended bond between primer and substrate. For both metal and plastic components, spray primers come in formulations designed to balance adhesion, build, and flexibility. Flexible primers for plastics help absorb movement without cracking, preserving the integrity of the underlayer as the topcoat expands and contracts with temperature shifts.
Powder coating represents the third key route, and it is increasingly chosen for its environmental and performance advantages. In a powder-based primer, a dry pigment-and-resin powder is applied to a heated part. Once the powder melts and fuses during curing, it forms a thick, durable layer with exceptional abrasion resistance and corrosion protection. Powder primers tend to yield very uniform thickness and can deliver thicker cross-sections without sags, which can be a boon for parts exposed to harsh service conditions. The powder route also aligns well with environmental goals because it avoids liquid solvents and minimizes volatile organic compound emissions. Each method—e-coat, spray, and powder—has its own practical place in a shop or factory, and the choice often reflects the part’s material, geometry, and expected service life.
Regardless of the chosen method, all primer applications benefit from a controlled environment. A dust-free spray booth or similarly controlled space protects the freshly laid film from particulates that could create pinholes or uneven peaks. Temperature and humidity matter more than many DIY enthusiasts realize. The ideal window for primer application tends to be around 20–25°C with 50–70% humidity. Too dry, and the solvent carriers dry too quickly, causing microvoids; too humid, and the film may blush, whitening, or lose adhesion. These conditions also influence cure behavior: a properly cured primer forms a stable, evenly cross-linked network that provides a dependable foundation for subsequent coats. In practice, this means time and patience between steps—not rushing through the primer stage—to ensure each coat lays down pristine and bonds uniformly to the surface.
The practical implications of substrate type extend into the selection of primer chemistries. On metal, several primer families emphasize barrier properties, adhesion to oxidized surfaces, and compatibility with base coats. On plastic, many manufacturers advocate for primers that include an adhesion promoter or a flexible base to accommodate the part’s movement. PP, a common plastic in bumper and interior applications, often requires a dedicated adhesion promoter before primer to counteract low surface energy and poor wettability. Skipping this step can result in topcoat delamination, edge lift, or microcracking under stress. A well-chosen primer does not merely cover; it transforms a potentially challenging substrate into a reliable platform for a smooth, durable finish. It also sets up the topcoat to achieve a uniform appearance, consistent gloss, and predictable color behavior across the part.
Architects of the modern paint line also consider the role of primer in the total lifecycle of a component. In many shops, a test panel is used to validate adhesion, film thickness, and cure performance before committing to a full production run. This small ritual—testing your primer on a scrap panel—can save countless hours and protect against costly rework. It is a reminder that the primer stage, though it may seem routine, is the hinge upon which the rest of the finish depends. If the adhesion is weak or the surface has not cured fully, even the most meticulously applied topcoat will reveal flaws after a few cycles of temperature and humidity. The goal is not merely a single perfect coat but a durable, uniform base that remains faithful to the intended color and gloss through years of exposure to sunlight, road grime, and highway heat.
In the broader painting sequence, primer serves as a bridge between the substrate and the color layer. The color coat relies on a stable, well-adhered foundation to deliver a true color match and consistent coverage. Any variance in primer thickness or adhesion can translate into a subtle shift in shade, a mottled finish, or a fragile edge where the topcoat is more vulnerable to chipping. The interaction between primer and topcoat also influences the way the final gloss settles and how well sanding marks disappear during finishing. For metal parts, a uniform primer layer minimizes the risk of reveal through the color film, while for plastics, a properly selected flexible primer reduces telegraphing and edge damage that can betray a glossy surface under close inspection. In short, primer is not an optional extra; it is the core of a lasting aesthetic and functional finish.
To connect theory with practice, consider how a typical bumper or panel undergoes primer treatment in a modern facility. The surface is first cleaned to remove oils and dust. If the part is a plastic substrate, an adhesion promoter is applied before the primer to ensure the film bonds securely to the surface. The primer is then applied in thin, even coats, with careful attention to film thickness. Between coats, a brief drying interval helps solvents evaporate and the film to settle. Once the primer has achieved the desired thickness and uniformity, a light, controlled sand may be used to flatten the surface and remove any slight imperfections. This prepares the ground for the topcoat, which will need a clean, even, and receptive surface to achieve a flawless appearance. In high-volume settings, automation and precise proportioning systems help maintain consistency across hundreds or thousands of parts, ensuring that every piece will behave predictably when the color coats are applied later in the cycle. For the reader, the message is simple: treat primer with the same precision you give to the final color, because the finish you see on the outside starts here, in the quiet work of preparation and priming.
From a practical standpoint, there is value in knowing when to escalate to more advanced primer systems or automation. Electrocoating lines, with their integrated cleaning and deposition steps, provide unmatched coverage for complex shapes and hidden surfaces. When a component design includes intricate ribs or internal channels, e-coat’s ability to reach every nook becomes a real advantage. For parts with high flex or dynamic stress, a flexible primer or a tailored adhesion promoter can preserve bond integrity even as the part expands and contracts during use. Powder primer, while less common on every part, offers outstanding resistance to chipping and abrasion for outdoor components or heavy-use assemblies. Each approach can yield outstanding results when matched to substrate, geometry, and service life expectations. In smaller shops or DIY contexts, a high-quality spray primer with compatible topcoat systems, applied in clean conditions and cured properly, can deliver professional results without the complexity of full-scale industrial equipment.
The practical takeaway, then, is that primer is the hinge of performance. It is where adhesion, corrosion resistance, and surface uniformity converge to support a durable color finish. The process is not a mere sequence of steps but a philosophy of preparation: clean thoroughly, select the right primer for the substrate, apply with controlled technique, and cure under carefully monitored conditions. When these elements come together, the color layer wears evenly, maintains its tone in sunlight, and resists wear from daily use. The result is a part that not only looks right but also survives the currents of time and road conditions.
For readers seeking a concrete visualization of these principles in a real-world context, a representative reference point for a typical bumper product page offers a practical anchor to how such components are prepared in the shop floor. See the front bumper page for context and to understand how primer strategy translates into production realities: front-bumper-mitsubishi-outlander-19. This link serves as a tangible reminder that primer decisions are made with an eye toward geometry, accessibility, and the way the finished part will be handled in assembly and service.
In closing, primer is not a single product on a shelf but a carefully engineered layer that sets the stage for every coat that follows. Its success depends on clean surfaces, correct substrate recognition, appropriate chemistry, precise deposition, and disciplined curing. The best primers are not the loudest players in the room; they are the most reliable partners in the dance of color and protection. When you respect primer as a foundational technology—whether you work in a high-tech factory or a small shop, whether you lean toward e-coat, traditional spray, or powder formulations—you equip each auto part to perform its role with confidence. The color you love and the finish you expect are built on this quiet foundation, and understanding it helps you plan, troubleshoot, and achieve results that endure.
External standards and deeper technical details can be found in industry resources that govern primer deposition and curing chemistry. For a deeper dive into official guidelines, consult SAE resources: https://www.sae.org
From Cure to Gloss: Finalizing the Auto Part Paint for Lasting Color and Protection

The final phase of painting auto parts is as deliberate as any earlier step, because the work done after the last spray determines how the color endures, how the surface feels to the touch, and how the finish withstands the daily assault of sun, moisture, and road grime. It is a phase governed as much by science as by craft. After the final coat of clear has been laid down, the part enters a careful curing window in which chemistry completes its work and the surface begins the long, patient journey toward a flawless, durable gloss. The practical aim is simple yet exacting: allow the coating to achieve maximum hardness and adhesion while preventing contaminants from pinching the finish or marring it during handling. In this moment, temperature and cleanliness become as important as pigment and solvent, because a perfect color can still be compromised by dust specks, a micro-crease, or a dull spot that the eye can detect only under natural light.
First comes the drying and curing phase. It may be tempting to treat the painted piece as if it were completely finished within a few hours, but two-component paints, in particular, require a longer, controlled period before any further work. The surface may feel dry to the touch, but the resin and hardener need time to fully cross-link. In a practical workshop or paint booth, this period is governed by a clean, dust-free environment with an ambient temperature that typically hovers around 68 to 77 degrees Fahrenheit (20 to 25 degrees Celsius). Humidity, too, matters; a moderate level helps prevent micro-cracking or whitening that can occur if the surface dries too quickly in a drier atmosphere. Rushing this stage invites pinholes, dust entrapment, or compromised adhesion once the piece is handled for masking or moving to the next steps. For 2K systems, the guidance is often to allow at least 24 hours of cure under these controlled conditions before any controlled handling or inspection. In practice, the longer you can wait—without exposing the piece to contaminants—the better the bond between the clear coat and the color layer becomes, and the more forgiving the surface will be to subsequent refinements.
Once the part has reached a stable, fully cured state, the work shifts to smoothing any micro-imperfections that can stand between the eye and a seamless surface. Wet sanding is the preferred approach here, and it begins with a conservative mindset: use fine grits, keep the surface wet, and proceed with deliberate, even motions. The typical range is 1500 to 2000 grit, chosen for its ability to neutralize fine orange peel, small dust nibs, or slight variations in pigment without creating new scratches. A sanding block is essential for maintaining uniform pressure and tracking, which helps ensure that the transition from the color coat to the clear coat remains invisible. The goal is not to erase texture but to refine it to a mirror-like smoothness that reflects light evenly across the panel. Throughout this stage, water, cleaner compatible with auto finishes, and careful inspection under good lighting are indispensable. Gentle, consistent pressure minimizes new flaws and preserves the integrity of the underlying layers.
With the surface now smooth, polishing becomes the step that restores and intensifies the gloss that the clear coat promises. A dual-action (DA) polisher is often the tool of choice for professionals, paired with a foam or wool pad and a quality polishing compound. The DA’s oscillating action reduces heat build-up and prevents swirl marks that can mar the finish, especially on curved surfaces like wheel hubs, scoops, or the edges of a bumper. The process typically moves from a relatively mild compound to a finer polish, with careful observation to avoid removing too much clear or cutting through the color layer. For stubborn micro-scratches or haze that lingers after wet sanding, a cutting compound can be used briefly, followed by a final, meticulous polish to restore depth and clarity. The emphasis here is not on aggressive abrasion but on controlled refinement, where the hand of the operator and the performance of the pad work in harmony to return a glass-like look to every inch of the panel. The result should be a surface that shines with even, rich color and a depth that draws the eye without revealing the mechanical process behind it.
After polishing, the finish receives its final protective layer. The choice between a wax, a sealant, or a ceramic coating is a decision informed by the owner’s needs and the expected exposure. A traditional wax adds a warm luster and a layer of sacrificial protection with a relatively simple application. Sealants offer longer durability and hydrophobic properties, helping water bead and shed more readily, which can simplify maintenance and keep contaminants from sticking. Ceramic coatings take this protection to another level, forming a chemical bond with the clear layer and offering superior resistance to UV radiation, chemical exposure, and minor scratches. Regardless of the option chosen, applying the protective layer should be performed with the same care as the initial color and clear coats: clean tools, smooth technique, and a controlled environment to prevent any new dust bits from embedding themselves in the fresh finish. The goal is not just to preserve the appearance but to extend the interval between major maintenance sessions, giving the part a showroom-like resilience against the elements.
A crucial part of this stage is the visual and tactile inspection conducted in a setting that mirrors real-world lighting conditions. Natural light, in particular, plays a decisive role in exposing any inconsistencies that indoor lighting may obscure. A careful walk-around of the panel helps identify orange peel, overspray, or waviness that could otherwise escape notice. If issues are detected, the sequence may be revisited: a touch more wet sanding, a lighter polish, or a reapplication of the protective layer to ensure uniform coverage. This is not a sign of failure but a signal that the process has achieved its precision through iterative refinement. The hand interactions—masking, spray technique, curing, sanding, polishing, and sealing—must all be performed with the same patient rhythm across the entire panel to guarantee that the edge transitions between painted areas stay crisp and the overall surface remains flat and vibrant.
In a broader sense, the finalization phase is where practice meets accountability. Every surface is an opportunity to demonstrate the painter’s understanding of the material—how metal and plastic respond to primer, how temperature influences cure, how the solvent system interacts with the base color, and how the protective layer commits to long-term performance. The materials themselves offer feedback in the form of gloss, hardness, and resilience, and the craftsman interprets that feedback through careful adjustments in technique, pressure, and timing. The result, when executed well, is a panel that not only looks freshly finished but continues to perform under sun, rain, and road spray for years to come. It is a measured sequence, but it is also a form of care that adds value to the entire vehicle, preserving its appearance and, in turn, its resale and ownership pride.
For those seeking a concrete example of how these refinements appear on a real panel, consider the hood of a popular Lancer Evolution model. While the majority of auto parts can benefit from this finishing sequence, the hood offers a particularly instructive case study because its contours and edges demand precise control during curing, sanding, and polishing. A practical reference point can be found on this internal page: 08-15 Mitsubishi Lancer Evo X Hood Phantom Black OEM U02. This page demonstrates how a hood’s dimensions and plane shifts challenge the painter to maintain uniform film thickness and avoid variable sheen across complex curves. It serves as a reminder that the best practices are not abstract rules but tangible techniques that translate across panels, shapes, and vehicle generations.
Beyond the hands-on technique, it is essential to remember that the finalization phase benefits greatly from a disciplined approach to environment and workflow. The area where the part rests after the final clear has cured should remain clean and protected from dust, moisture, and temperature extremes. Any exposure to smoke, aerosol cleaners, or abrasive compresses can compromise the surface and undo hours of meticulous work. The workflow should be designed to minimize handling of the finished piece while still allowing for necessary inspections and minor touch-ups if needed. In all, finalizing paint on auto parts is a balance of patience, precision, and environmental stewardship, where the goal is a durable, even, and richly colored finish that stands up to the realities of daily driving.
External resources can provide a broader framework for these final steps. For a comprehensive, step-by-step reference that covers preparation through final detailing, you can consult the widely used guide on how to paint auto parts: https://www.wikihow.com/How-to-Paint-Auto-Parts. This resource aligns with the core principles described here and reinforces the emphasis on controlled curing, careful surface preparation, and thorough protection strategies. Alongside such guidance, practitioners may find it valuable to explore real-world examples within the automotive parts community. For instance, there are detailed case studies and product catalog pages that illustrate finishing on components such as hoods, bumpers, and wheels, highlighting how color, texture, and gloss interact with different substrate materials and paint systems. The synergy of hands-on technique and documented experience forms a robust foundation for anyone aiming to achieve professional-grade results that endure.
In summary, the finalization of auto part paint is the culmination of preparation, application, and aftercare conducted with deliberate care. It requires an environment that respects chemistry, a workflow that emphasizes consistency, and a mindset that values long-term durability as much as immediate beauty. The careful progression from curing to wet sanding, from polishing to protection, and then to inspection creates a finished surface capable of resisting wear while maintaining its luster. When these steps are performed with discipline and attention to detail, the result is a finish that not only looks premium but provides meaningful protection for years to come.
Final thoughts
The art of painting automotive parts is both a science and a skill that requires understanding key processes, including preparation, masking, priming, and the final paint application. By mastering these steps, business owners can not only enhance the aesthetic appeal of their products but also significantly increase their durability and resistance to environmental damage. Investing in quality processes translates directly to customer satisfaction and repeat business. Embrace these techniques, and your automotive parts will stand out in both quality and appearance in an increasingly competitive market.