
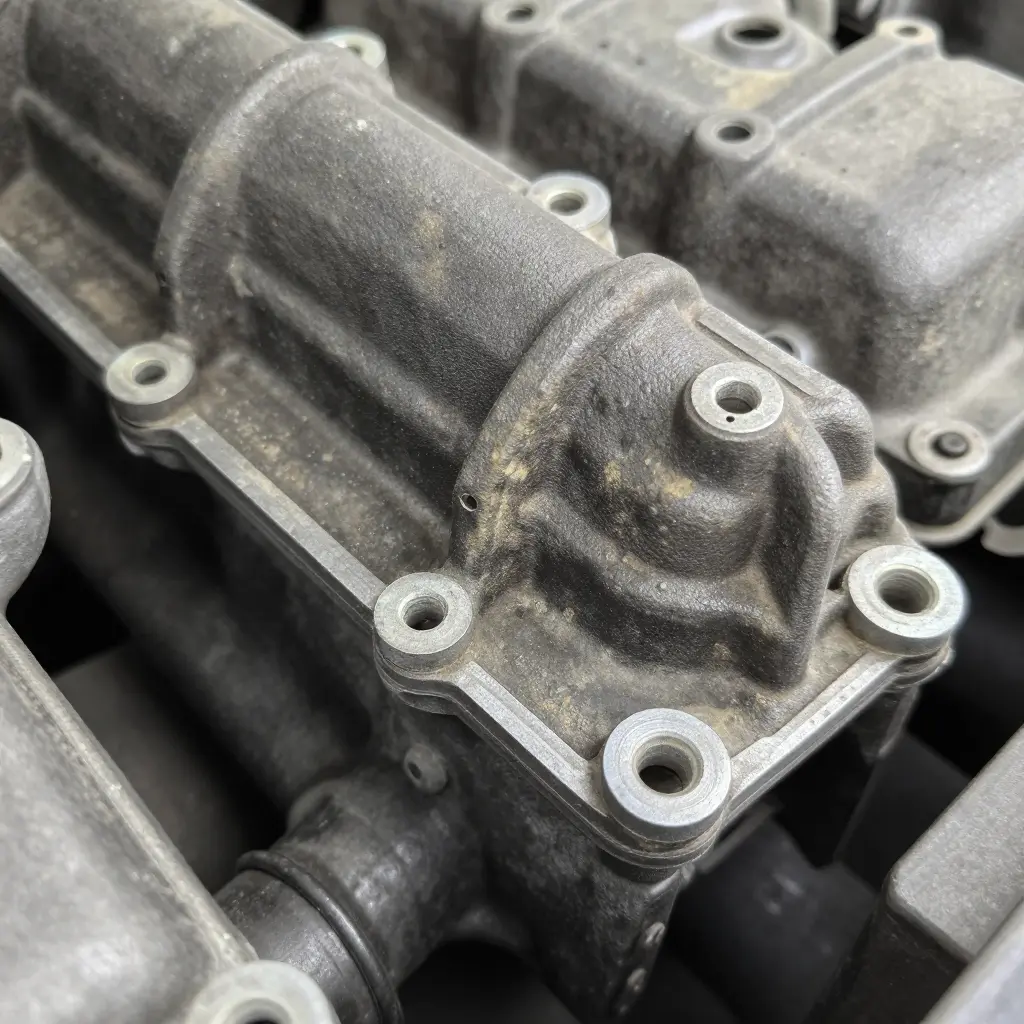
2001 Mitsubishi Lancer Cedia 4G15 Idle Vibration: A Worn Engine Mount, Not a Tune-Up Problem
On a 2001 Lancer Cedia with the 4G15, most idle vibration comes from a failed mount rather than from ignition or fuel delivery. The engine is running fine. The rubber holding it in place is not.
New plugs, fresh leads, a clean throttle body and correctly set ignition timing all improve combustion. None of them restore what a collapsed mount has lost: the ability to carry load and soak up movement. Once the rubber has failed, the engine sits on its bump stop and every firing pulse goes into the subframe, the steering column and the floor pan. At a stoplight it feels like a misfire, yet the scan tool shows clean fuel trims and no stored codes.
The checks below tell the two faults apart in a few minutes, explain why a tune-up changes nothing once the mount has failed, and put a price on the swap in parts and labor.
Displacement, mount layout, torque values and service intervals are listed in the 4G15 engine specifications for the 2001 Lancer Cedia, which is worth reading before you order anything.
Why Idle Vibration Is Routinely Misdiagnosed as a Tune-Up Fault
A shaking wheel, a buzzing dash and a slightly rough idle send most owners, and plenty of technicians, to the ignition system first. Plugs, coils, throttle body carbon and a dirty idle air control valve all produce those symptoms, so the reasoning is sound as far as it goes. It assumes, though, that a rough idle means bad combustion. Sometimes combustion is fine and the cabin is simply getting more of it than it should.
Combustion faults follow load and firing order. A weak plug or coil tends to misfire on a rhythm tied to the firing order, gets worse under acceleration and often stores a code. A failed mount does not work that way. The 4G15 in the Lancer Cedia already idles with a visible pulse, and a torn mount magnifies that existing motion instead of adding a new one.
The test that separates them is load direction, not engine speed. Shake that appears in Drive or Reverse with the brake down and fades in Park or Neutral points at the mounts. If the shake changes when torque reaction reverses between Drive and Reverse while idle speed stays steady, the mount is the prime suspect. A tune-up may improve combustion, but it cannot stop a worn mount from passing normal engine movement into the chassis.
Engine Mount Load Path and Vibration Isolation
The 4G15 sits transversely in the Cedia’s subframe on mounts doing three jobs at once. They carry the static weight of engine and transaxle so the block does not sag onto the crossmember. They restrain torque reaction: the block tries to rotate one way under acceleration and the other way on overrun, and the front and rear roll stoppers limit that rocking. And they keep high-frequency vibration out of the subframe and the cabin.
Trace where the force goes. Combustion pressure and reciprocating mass leave the block through the cast bracket bolted to its side, pass into the elastomer bushing or the fluid-filled mount, travel down into the subframe, and reach the body through the subframe bolts. Every one of those interfaces is tuned to dissipate energy. None is meant to be a solid joint.
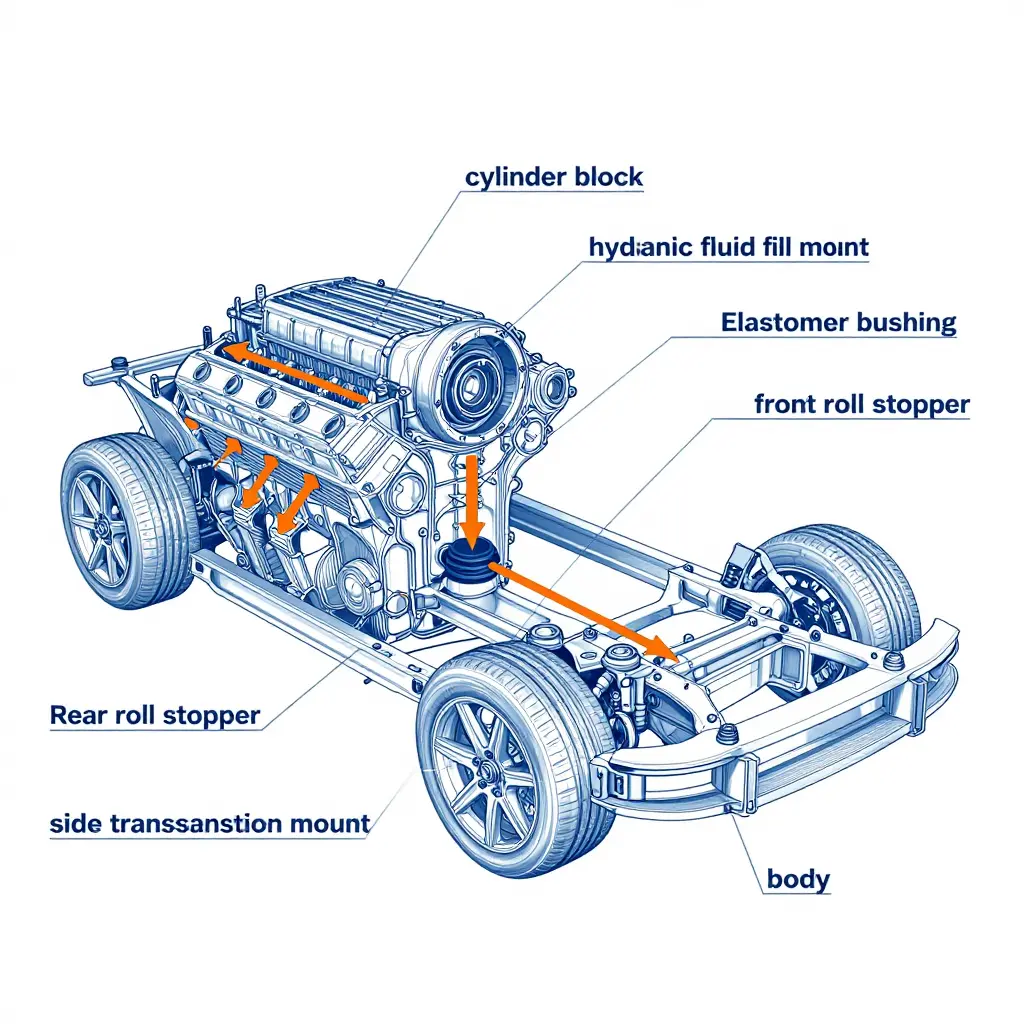
When the bushing hardens, cracks or pulls away from its inner sleeve, or the fluid-filled mount loses its charge or stops sealing, the mount quits absorbing low-amplitude movement and turns into a rigid link. The pulses go straight into the chassis. The front roll stopper usually follows, then the transmission-side mount.
That is why the complaint is an idle-only, in-gear, low-speed shake rather than a high-rpm misfire. At 700-900 rpm each cylinder pulse arrives as a separate low-amplitude kick, in the frequency band a hydraulic mount is built to cancel. Put the selector in Drive or Reverse, load the engine against the brakes, and those pulses have nowhere left to go.
A misfire behaves the other way round. It worsens with load and rpm, usually sets a cylinder-specific code, and shakes the car at cruise. A collapsed mount is worst at a standstill, eases as rpm rises and the pulses smooth out, and shows itself as block lift at the bracket during a brake-torque test.
If you are already pricing the repair, confirm the part suits your CS2A chassis before ordering hardware; the 4G15 engine listing for the Lancer Cedia is the place to match it.
Field Reference: Separating Mount Wear from Tune-Up Faults
Use this table on your 2001 Lancer Cedia 4G15 before buying any parts.
| Symptom / Observation | Worn Engine Mount | Tune-Up or Combustion Fault |
|---|---|---|
| Vibration at idle in gear, brake applied | Strong, constant shudder in cabin | Usually mild, worsens only intermittently |
| Behavior when RPM raised to 1,500-2,000 | Vibration fades and smooths out | Misfire persists or returns under load |
| Engine shake visible with hood open | Excess rocking, mount gap visibly flexing | Sharp, uneven shake with visible stumble |
| Check engine light or misfire codes | No codes, all monitors clean | P0300 misfire codes, flashing check light |
| Vibration severity vs. engine load direction | Worst in drive or reverse under load | Tracks rpm and throttle, not gear |
| Noise type | Dull thud or clunk on take-up | Uneven exhaust note, popping or sputter |
| Effect of turning on air conditioning | Shudder jumps as compressor engages | Slight roughness, idle speed compensates |
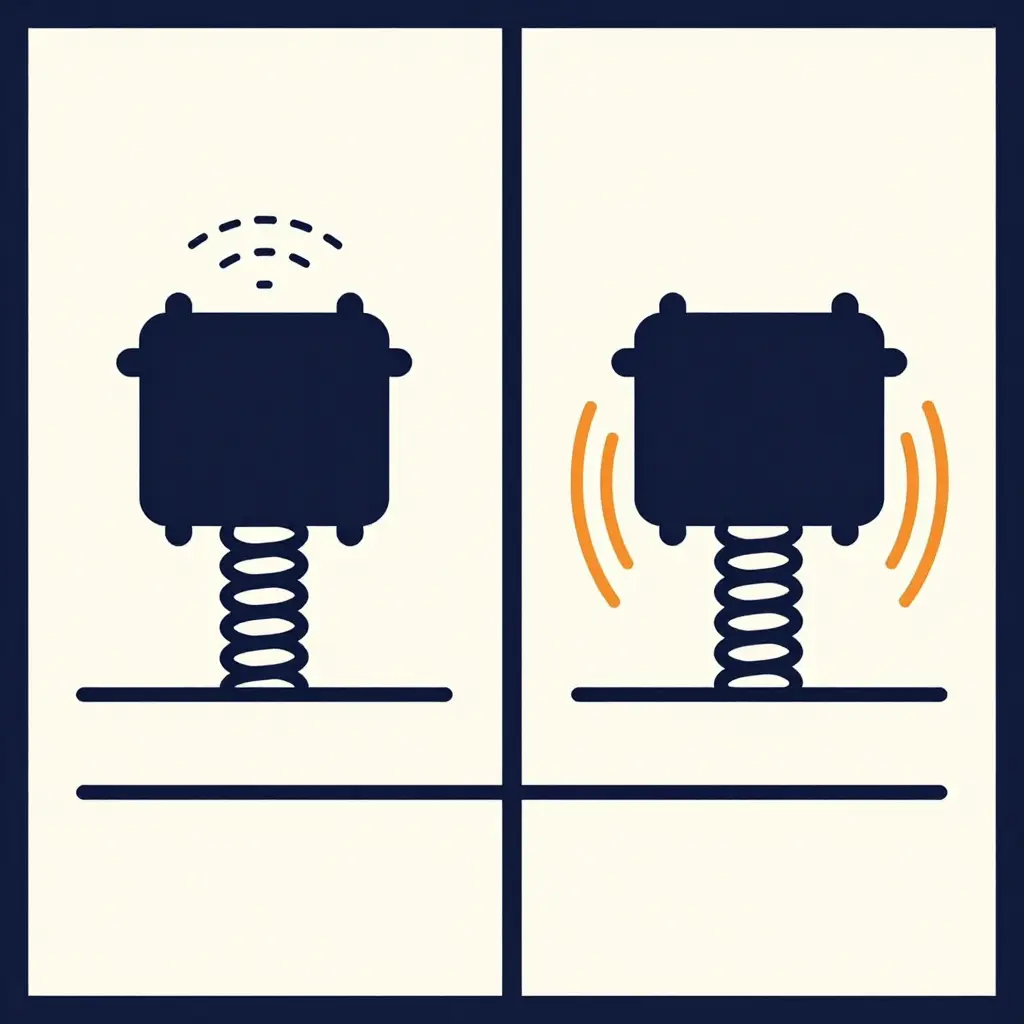
Left: a healthy mount absorbs the idle shake before it reaches the subframe. Right: a collapsed mount lets the same energy pass straight through.
Isolating a Bad Mount With the Car Still on the Ground
You do not need to pull the engine, drop the subframe or unbolt a single mount to find out whether the shake comes from a collapsed isolator. With the car on its wheels and a flashlight, a pry bar and a helper to hand, the inspection takes about half an hour. Work through the checks in order, from the least intrusive to the most revealing, and note which mount moves worst. Reference photos and part numbers sit in the 4G15 engine section for the 2001 Lancer Cedia.
- Inspect the elastomer for cracking and separation. Shine a light into the gap around each rubber biscuit and look for surface crazing, deep splits, or a visible tear where the rubber has pulled away from the steel sleeve; a gap wider than a couple of millimeters on one side signals collapse.
- Check every mount for fluid weeping. Wipe the underside of any fluid-filled mount with a clean rag and re-check after a short drive, since a dark, oily stain mixed with road dust at the base of the housing means the damping bladder has ruptured.
- Pry bar test, engine off and cold. Slip a pry bar between the mount bracket and the body, apply firm but steady leverage, and watch for more than roughly 3-5 mm of deflection, or a rubber-to-metal gap that opens and closes under load.
- Brake torque test in Drive and Reverse. Hold the foot brake hard, load the engine briefly in Drive, then repeat in Reverse, and have a helper watch the engine while you note whether it rises sharply on one side or clunks as torque reverses.
- Measure engine movement against the cowl or radiator support. Pick a fixed reference point, record the gap at rest, repeat the brake torque test, and quantify the swing with a tape measure. Anything beyond about 10-15 mm points to a failed mount rather than a rough idle.
- Compare transmitted vibration before and after partial loading. Read baseline vibration at the steering wheel or seat, slide a floor jack under the oil pan with a wood block and lift just enough to take part of the weight, then listen for the harshness to fade.
The check passes only when every step comes back clean: intact rubber, no fluid loss on fluid-filled units, minimal deflection, and no change in cabin vibration under partial load. One failure is enough to justify replacement.
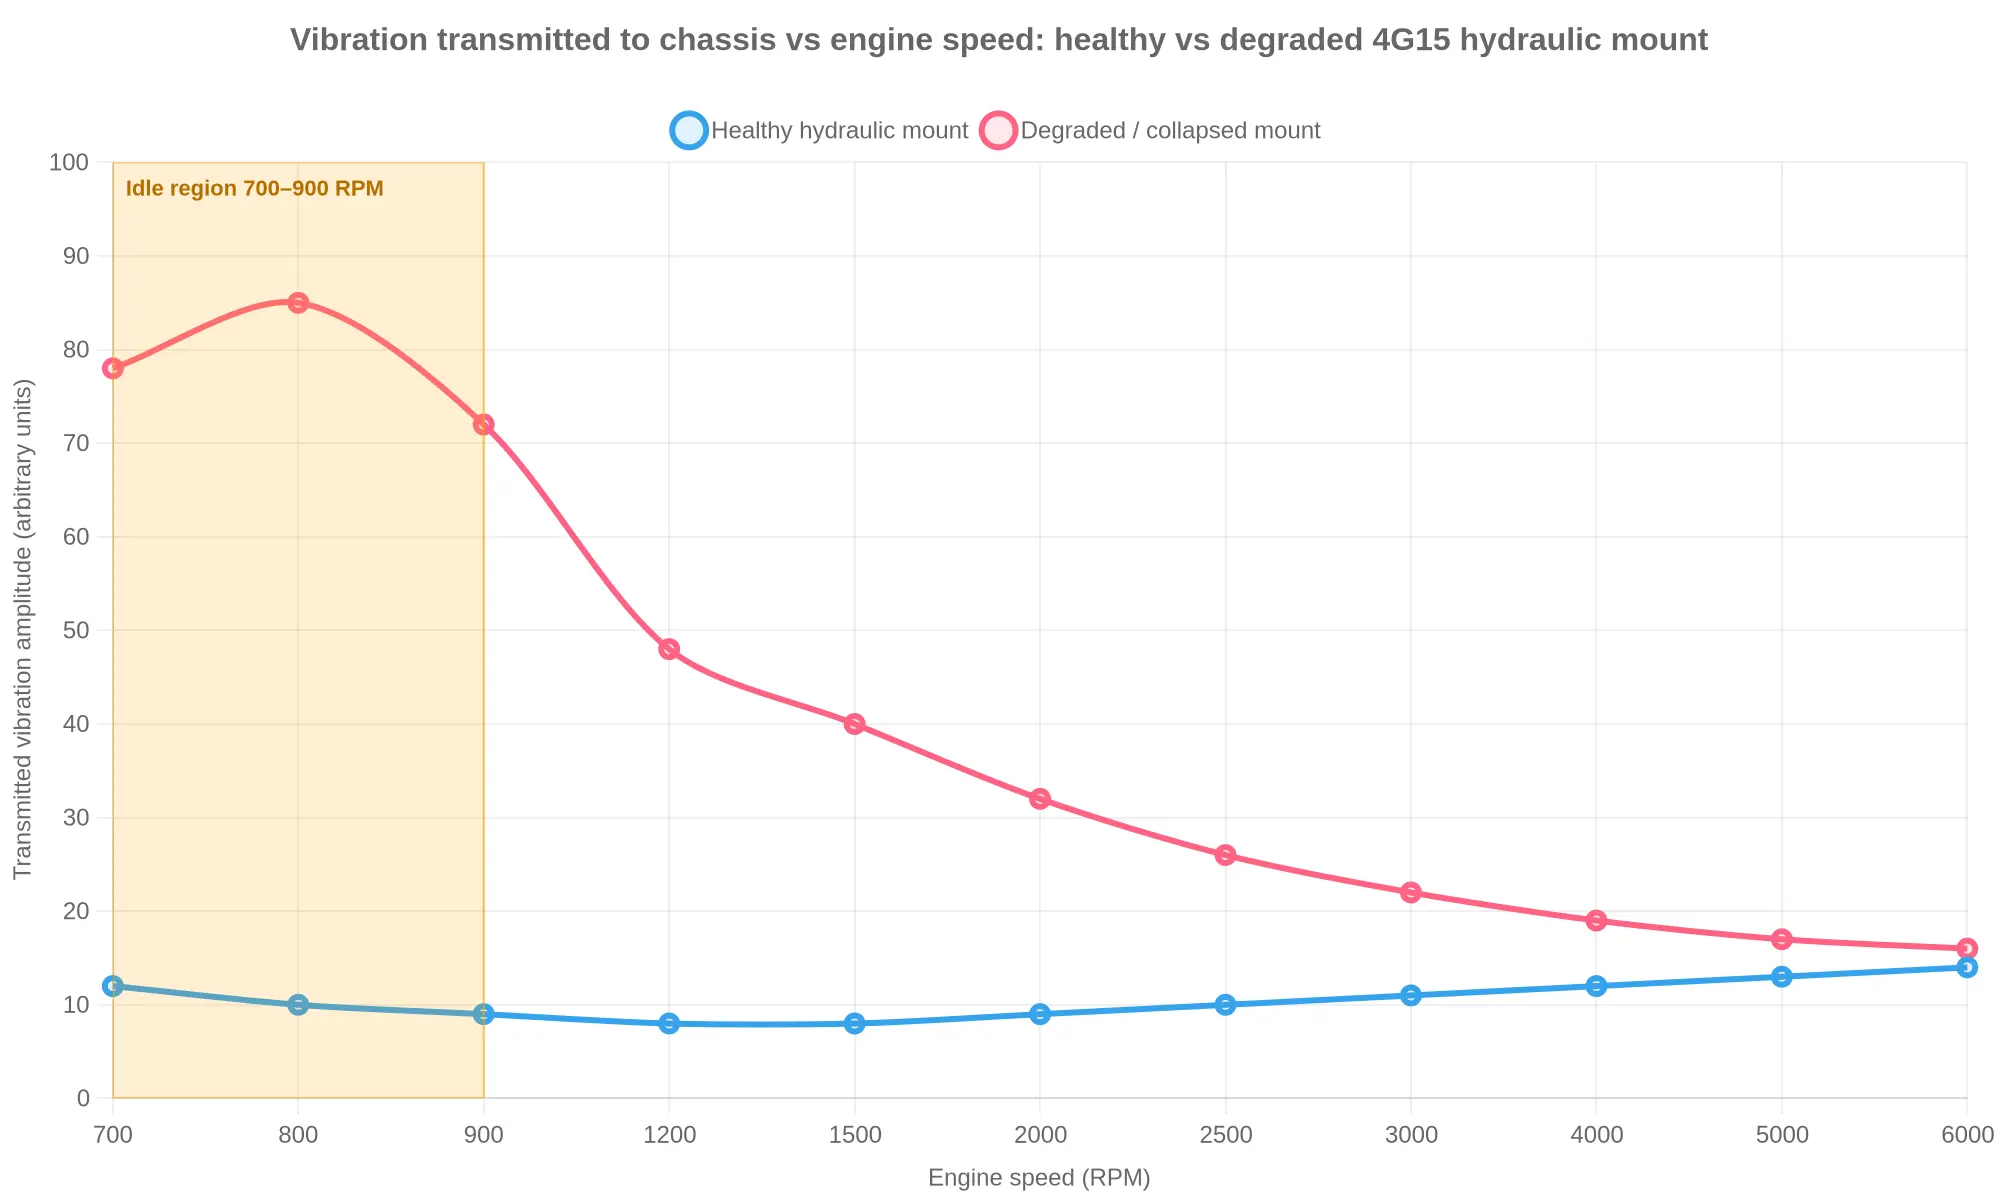
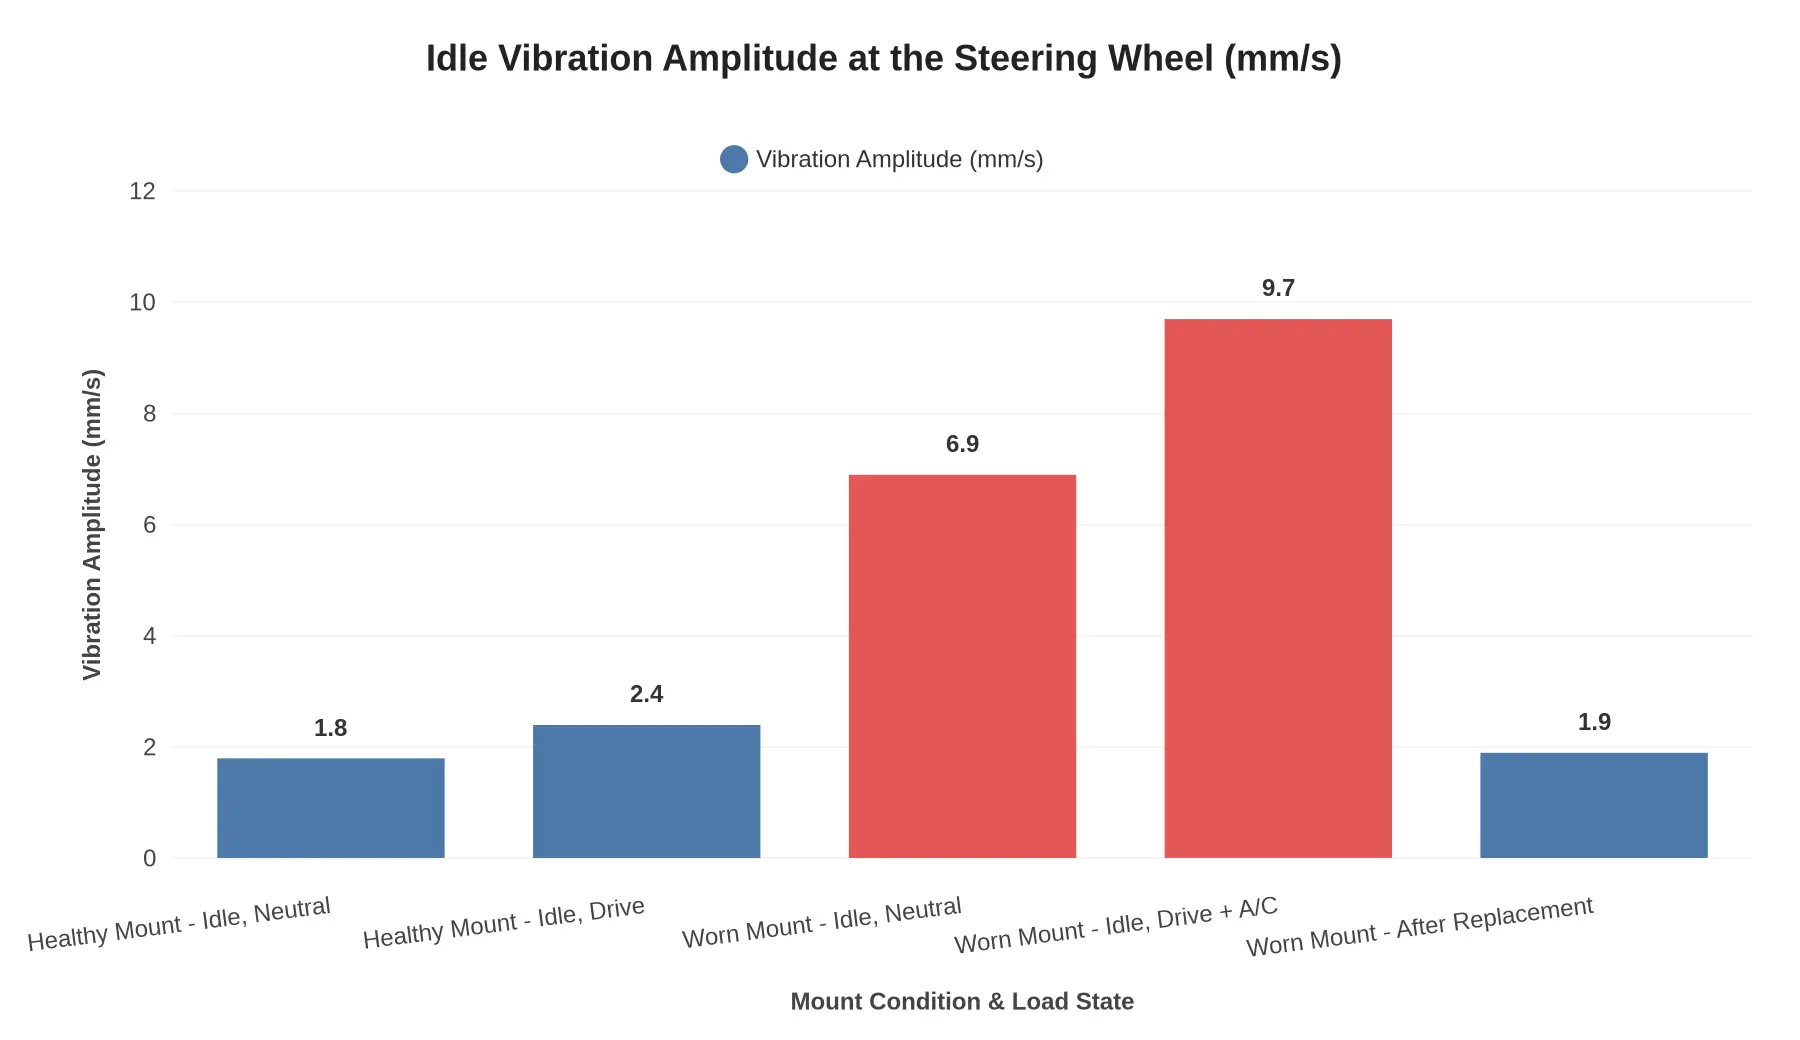
Idle Vibration Amplitude: Healthy vs. Worn Mount, Measured at the Steering Wheel
Before spending anything on plugs, coils or a throttle body clean, it is worth seeing what a failing mount does to the numbers. On the 4G15 in the Lancer Cedia, a healthy hydraulic mount keeps idle shake low and steady. Once the rubber and the fluid charge collapse, the same engine, with the same ignition and the same fuel trims, transmits a completely different signature into the cabin, and it gets worse the moment you load the driveline in Drive or switch on the A/C.
| Mount Condition & Load State | Vibration Amplitude (mm/s) |
|---|---|
| Healthy mount – idle, Neutral | 1.8 |
| Healthy mount – idle, Drive | 2.4 |
| Worn mount – idle, Neutral | 6.9 |
| Worn mount – idle, Drive + A/C | 9.7 |
| Worn mount – after replacement | 1.9 |
The digits matter less than the shape of the data. Healthy and worn states sit in two separate bands, the worn mount climbs steeply as load increases, and a new mount drops the reading straight back to baseline. That return is what a mount problem looks like; ignition work cannot pull a bar back down like that.
Chart shown is illustrative reference data, not a measurement of any specific vehicle.
How 4G15 Cedia Engine Mounts Fail Over Time
The mounts rarely fail in one dramatic moment. They degrade in a slow, predictable order, which is why the vibration creeps up on owners instead of announcing itself.
Stage 1 – Elastomer hardening from heat cycling
The 4G15 sits transversely in a tight bay, and every heat cycle bakes the rubber mounts from the exhaust side outward. Over years of expansion and contraction the elastomer loses its plasticizers, hardens and develops fine surface cracks. Hard rubber stops absorbing vibration and starts transmitting it, which shows up first as a faint buzz through the steering wheel and seat at idle.
Stage 2 – Rubber-to-metal separation
Once the elastomer is stiff, stress migrates to the bond line where rubber meets the steel plate. Separation typically begins at the outer edges and propagates inward. By this point the mount has real slack, and you will notice engine rock on start-up, a clunk on gear changes, or movement when the throttle is blipped in neutral.
Stage 3 – Hydraulic mount failure
Some Cedia 4G15 versions use a fluid-filled mount to cancel low-frequency idle shake. Inside, fluid moves through a tuned orifice; when the diaphragm or bladder ruptures, the fluid escapes and the damping collapses. Look for dark, oily staining on the mount body or the subframe beneath it. This is the stage where a mild shake turns into a distinct, low-frequency thump.
Stage 4 – Engine sag loads the survivors
With the loaded mounts collapsed, the engine and gearbox assembly sags and shifts out of alignment. The remaining mounts and brackets now carry loads they were never sized for, so they degrade faster than the part that failed.
Stage 5 – Secondary wear on brackets and hoses
Excess movement is unforgiving. Bracket holes elongate, bolts work loose, coolant and power-steering hoses stretch and chafe, the exhaust flex section fatigues, and wiring looms rub through insulation. This is the stage where a cheap mount repair turns into an expensive one.
Mileage is a weak predictor
The odometer tells you very little here. A low-mileage city car sitting in traffic in a hot climate, leaking a little oil from the cam cover onto the mount, can be far harder on rubber than a high-mileage highway car. Heat exposure, oil contamination and the number of load cycles matter more than kilometers driven, so test the mounts rather than trusting the odometer.
| Factor | Effect on mount life |
|---|---|
| Heat cycling | Accelerates elastomer hardening and cracking |
| Oil contamination | Softens and swells rubber, weakens the bond |
| Stop-start driving | More load cycles through the torque path |
| Hot climate idling | Sustained radiant heat soak |
| Highway cruising | Relatively benign, steady load |
Why replacing one mount is a false economy
Swap only the visibly failed mount and the new part carries the full torque reaction from day one, so it fails early and the labor gets paid twice. Replace as a set, or at minimum as an axle pair, and use correct-spec 4G15 mounts and related components for the Lancer Cedia. Once idle vibration has started, treat all the mounting points as one system; the fix holds only when the degraded pieces go together.
What the Mount Swap Really Costs
Most owners come to this job expecting one part and one price. On a 2001 Lancer Cedia the bill is usually four or five line items that move independently of each other.
| Cost component | Planning estimate (USD) | What drives the spread |
|---|---|---|
| Aftermarket mount, per unit | $25-70 | Brand, solid rubber vs fluid-filled, supplier margin |
| OEM mount, per unit | $55-120 | Genuine part pricing; the fluid-filled unit sits at the top |
| Mounts replaced per job | 1-4 units | Inspection findings, mileage, load-path pairing |
| Labor time | 1.5-4.0 hours | Which mounts, seized bolts, subframe access |
| Shop hourly rate | $60-150 / hour | Independent vs dealer, region, specialty labor |
| Alignment after job | $70-150 | Whether frame-side or subframe hardware was disturbed |
| Fasteners, seized or snapped bracket | $0-200 | Rust belt condition, extractor time, replacement bracket |
| Repeat job if only one mount is swapped | $120-350 added | Wear on the untouched mounts |
Parts: OEM versus aftermarket engine mount
Cedia mount prices sit in a wide band: $25-70 per unit for aftermarket rubber, $55-120 for OEM, with the fluid-filled mount often at the top of the range. Construction, brand and whether the box says genuine or reboxed explain most of the spread. On a car this old, the OEM-versus-aftermarket decision is about how long you plan to keep it, not about prestige.
How many mounts actually get replaced
A real job usually covers one to four mounts, and three is common: front, rear and transmission-side. Those three share the load path on the 4G15 and usually share the same mileage, so they tend to fail within a season of each other. Grouping them is not upselling.
Labor: the variable people underestimate
Labor runs 1.5 to 4.0 hours at $60-150 an hour, billed as book time or actual time depending on the shop. The low end is one accessible mount on a clean car. The high end is a rust-belt car where bolts shear and a bracket has to be cut out. Access drives the estimate, then seized hardware, then whether the subframe or accessory brackets have to come loose.
The incidentals that quietly add up
Alignment is the usual add-on at $70-150, and it is needed if frame-side mount hardware or subframe bolts were disturbed. Fasteners and a seized or snapped bracket add $0-200, a line that is far more volatile than the parts cost. In heavily salted regions, budget at the top of every range.
The most expensive option: doing it twice
Replace only the visibly torn mount and the engine keeps moving on the worn ones, so the new part takes all the strain and fails early. A repeat job a year later adds $120-350 in parts and labor. Paying an extra $60-150 now to replace the worn set together is almost always the cheaper path.
Every figure here is an estimate for planning purposes. Parts pricing shifts with supplier stock, and labor varies by region and by how cooperative the bolts are on the day, so treat these as parts and labor ranges for the 4G15 Cedia engine rather than a quote.
Engine Mount FAQ: 4G15 Lancer Cedia Idle Vibration
These are the four questions owners ask once a shake at idle has been traced to a collapsed isolator rather than to ignition or fuel delivery.
Can a tune-up fix idle vibration on a 4G15 Lancer Cedia?
No. A tune-up restores combustion quality through plugs, leads, filters and base idle settings, and it does nothing about how much engine movement reaches the subframe. If the rubber in the mount has collapsed or separated, the 4G15’s normal idle torque reaction still transmits into the chassis. The giveaway is behavior: mount-related shake is strongest at idle in Drive with the brake held and settles noticeably once engine speed rises or the selector moves to Neutral, while a genuine ignition or fueling fault usually stays rough across the rev range.
How many engine mounts does a 2001 Lancer Cedia have and which one fails first?
A 2001 Lancer Cedia (CS2A) with the 4G15 engine uses four mounting points: a right-hand engine mount, a left-hand transaxle mount, and front and rear roll stoppers. The right-hand engine-side mount fails first in almost every case, because it carries the greatest static load and absorbs the full torque reaction under acceleration. The front roll stopper is usually second, showing a torn or flattened rubber block that lets the engine rock fore and aft.
| Mount position | Primary function | Typical failure order |
|---|---|---|
| Right (engine side) | Carries engine weight, absorbs torque reaction | First |
| Front roll stopper | Limits fore-aft engine rocking | Second |
| Left (transaxle side) | Carries gearbox weight, absorbs torque reaction | Third |
| Rear roll stopper | Controls reverse-load rocking | Third to fourth |
Can I drive with a worn engine mount?
Yes, but keep trips short and gentle until it is replaced. The engine keeps running normally, while the excess movement strains parts that were never designed to act as load paths: exhaust flex joints and hangers, radiator and heater hoses, harness clips, and in severe cases the driveshaft angles. Stop driving if you hear knocking or clunking on acceleration, if the cooling fan contacts its shroud, or if the engine visibly shifts when a helper blips the throttle. The question is distance and load, not whether the car still starts.
Should I replace engine mounts in pairs?
Replace along the same axis: the right and left load-bearing mounts together, and the front and rear roll stoppers together. Mounts share load, so a new isolator paired with a twenty-year-old one transfers the movement to the older part, which fails shortly afterward and produces a second labor charge. On a car of this age, replacing all four at once is frequently the cheaper path, since the remaining rubber has already aged and the labor overlaps almost entirely.
Decision Guidance: Turning the Diagnosis into a Repair Decision
The order is fixed. Confirm the mount with a load test before authorizing ignition or fuel-system work. A mount that holds the engine steady under torque does not need replacement, and money spent on plugs, coils or injectors will not quiet a vibration that starts at the chassis.
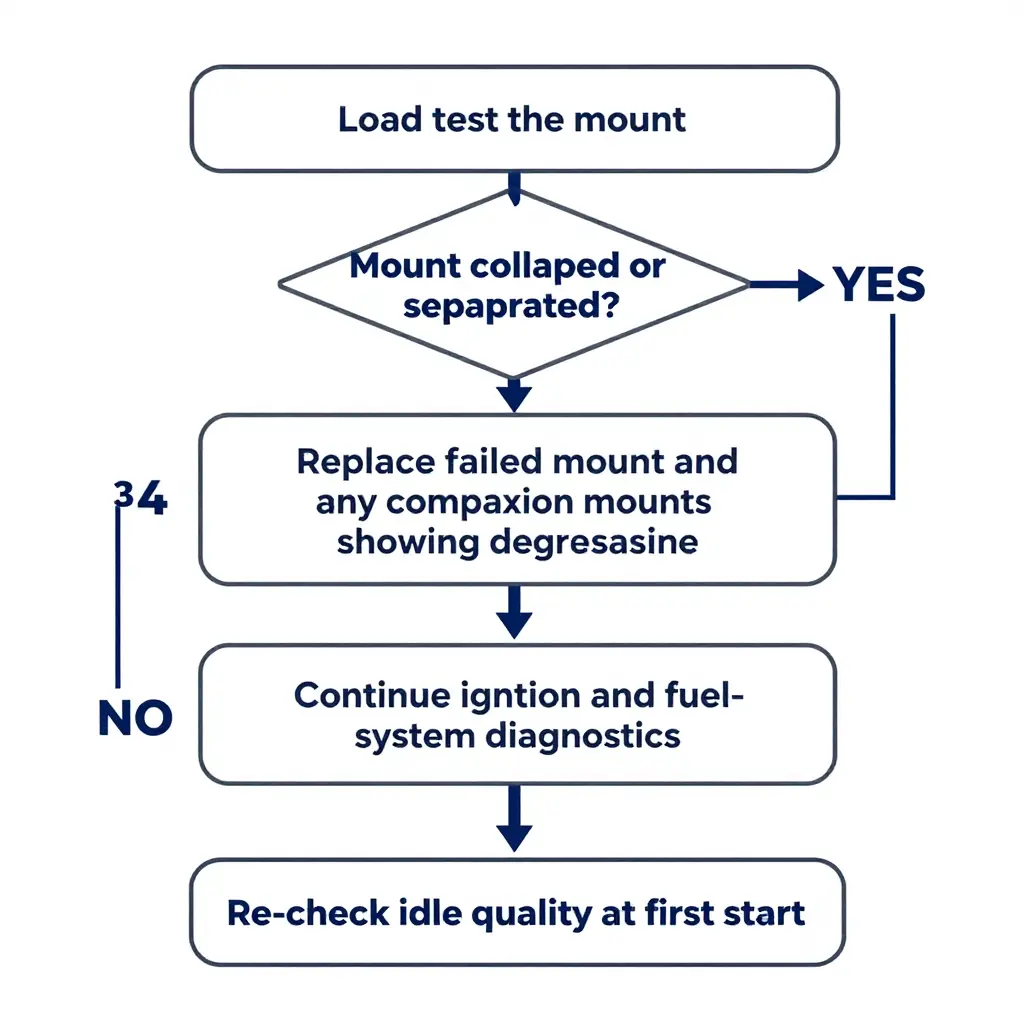
Step 1: Confirm the mount with a load test
The load test gates every step after it. Bring the engine to operating temperature, set the parking brake, and load the driveline in Drive and in Reverse while a second person watches the mount. A serviceable mount allows limited movement and returns to position. A failed mount separates, collapses, or hands the movement to the body shell. Write down what you see before anyone opens a work order.
Step 2: Replace the failed mount and its degraded companions
When the mount fails the test, replace it plus any companion that shows degradation. Mounts on this platform age on the same schedule, so a new front mount next to a collapsed rear keeps the same vibration path open and the same complaint comes back after the invoice is paid. Check the whole set while the car is on the lift, and confirm fitment against the 4G15 engine specifications for the 2001 Cedia.
Step 3: Re-check idle quality at the first start
Start the engine cold, let it settle into a stable idle, and feel vibration at the steering wheel, seat frame and floor pan. Compare against the notes you took before the repair. A clean result closes the job. Anything left points to a mount that was not replaced, a fastener left loose, or a second fault the load test could not show.
| Observation at the mount | Decision |
|---|---|
| Holds load, returns to position | Do not replace; continue ignition and fuel diagnosis |
| Separated, collapsed, or torn | Replace the failed mount and any degraded companions |
| Movement transfers into the body | Replace the mount set, then re-test idle |
A correctly diagnosed mount replacement fixes the idle vibration a tune-up cannot.