
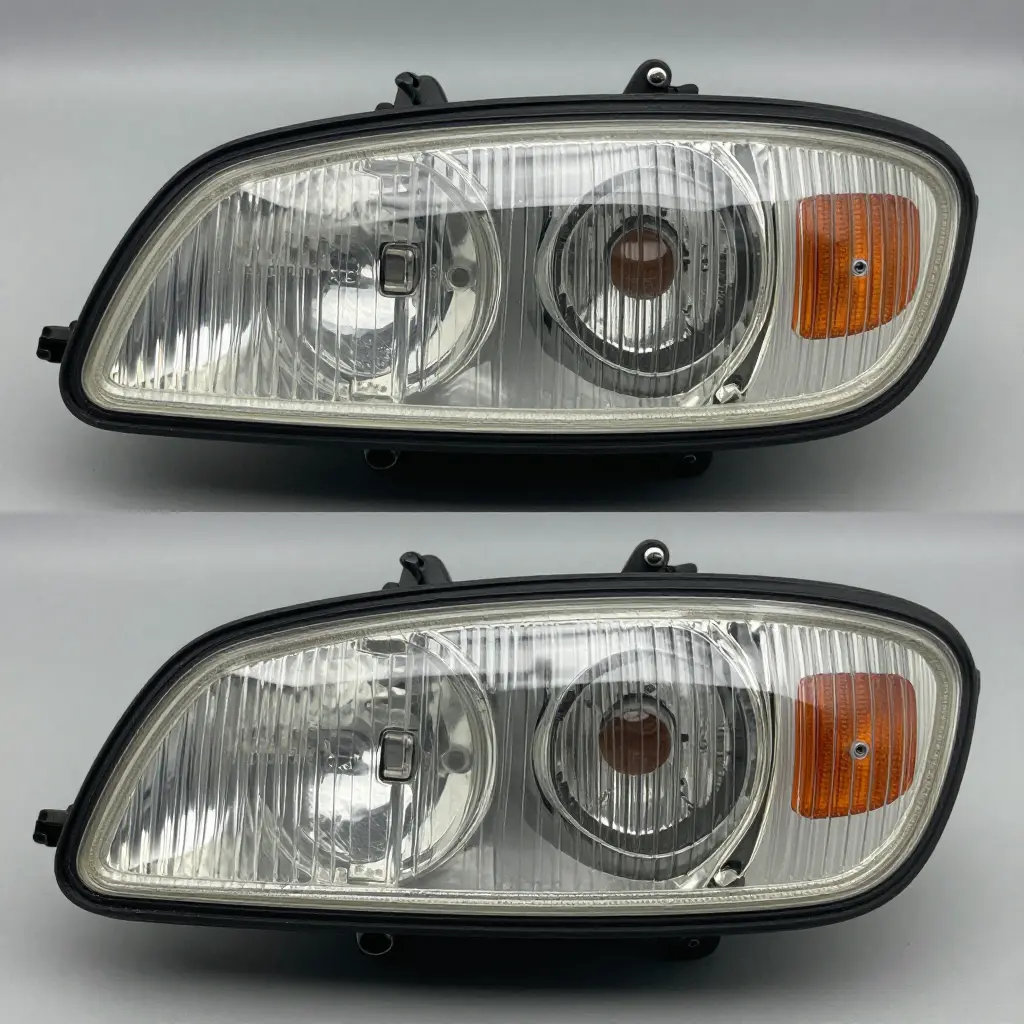
Replacing the lighting on a 1995-1999 Mitsubishi 3000GT comes down to part numbers and geometry. A correct number on the box does not prove the housing will sit in the fender pocket: sourcing 3000GT clear headlight glass means matching lens geometry, housing depth, and mounting points to the trim, because SL and VR4 fascias differ in contour, internal bracketry, and vent routing. Driver and passenger castings do not swap either. Before a unit goes anywhere near the car, check the perimeter gasket channel and the butyl sealant bead.
Two product types are sold for these cars: replacement lens glass and complete assemblies. Both depend on the same parts:
- Polycarbonate lens or clear glass, matched to the original curvature
- Housing shell with factory mounting tabs
- Perimeter gasket that seats against the fascia
- Butyl sealant bead sealing lens to housing
- Vent provisions that equalize pressure without admitting moisture
One of them fails and condensation returns within weeks. Our 1995-1999 3000GT SL and VR4 clear headlight glass listings separate driver from passenger side, so compare part numbers rather than appearance.
SL vs VR4 Headlight Compatibility: Where Interchange Ends
OEM documentation assigns the 1995-1999 3000GT headlight assembly different part numbers, with different suffixes, for SL and VR4. The two housings share a similar lens footprint and mounting envelope, which is why they get confused. Inside, the VR4 housing is built around a projector low beam with a dedicated beam-pattern component; the SL uses a reflector bowl. Lens and reflector optics are matched to those internals and do not cross over. Harness and ballast provisions differ as well, and mounting tabs vary by bracket revision, so bolting up is not proof of compatibility.
Confirm interchangeability by OEM part number instead of visual similarity. Compare the suffix on both the housing and the lens, and match the assembly to the trim and model year recorded on the car. A VR4 assembly will not drop into an SL harness without verifying connector pinouts and wiring provisions.
1995-1999 Mitsubishi 3000GT Clear Headlight Assembly Comparison: SL vs VR4
| Feature | SL Trim | VR4 Trim |
|---|---|---|
| Lens material / clear-coat | Polycarbonate, UV clear-coat | Polycarbonate, UV clear-coat |
| Internal beam component | Reflector housing, halogen | Projector low beam, halogen |
| Housing mounting tabs | 4 tabs, fixed points | 4 tabs, reinforced bosses |
| Harness / connector provision | 9006 / 9005-style sockets | 9006 / 9005 plus aux leads |
| Ballast or HID provision | None, halogen only | Ballast mount optional |
| Seal and gasket design | Full-perimeter rubber gasket | Full-perimeter gasket, double lip |
| Side-specific orientation | Driver and passenger distinct | Driver and passenger distinct |
| Recommended verification method | Cross-check OEM part number | Cross-check OEM part number |
Buyers must confirm fitment against the vehicle’s OEM part number before ordering: SL and VR4 trims use different internal beam and harness configurations.
Driver Side vs Passenger Side Fitment: Left and Right Are Not Interchangeable
Driver and passenger headlights on the 1995-1999 Mitsubishi 3000GT are dedicated parts, not a universal casting. Geometry is the first difference: each lens carries an asymmetric beam cut-off engineered for a left-hand drive configuration, with the step rising toward the right shoulder on both sides. The lens prism orientation that shapes it is molded per side rather than rotated. Internal reflectors and projector housings are mirrored for the same reason, so a left unit cannot produce a legal right-hand beam pattern. Mounting bracket indexing and tab placement differ too, and a swapped unit will not land with the right panel gap or enough aim range. Mitsubishi part-number suffixes separate left from right, so confirm the suffix before ordering 1995-1999 3000GT clear headlight assemblies.
Identify the correct side using these checks:
- Read the part-number suffix on the housing casting, not the lens sticker.
- Confirm the cut-off step rises toward the correct direction for that side.
- Dry-fit the mounting tabs before torquing any fastener.
A left lens on a right housing produces glare for oncoming traffic, a broken cut-off line, and a seal that will not hold.
Reading the Driver vs. Passenger Headlight Diagram

The diagram strips an SL/VR4 housing down to bare geometry, which is the fastest way to see which features mirror and which do not.
How to read it:
- Lens outline – The rounded trapezoid represents the front glass and housing flange. Note that the long, sloped edge switches sides between the two units; that slope follows the fender line, not the bumper line.
- Prism hatching – The small chevrons inside the lens show the direction of the optical prisms. They lean in opposite directions on each side, which is why a clear glass lens cannot simply be flipped upside down to fit the other side.
- Triangle markers – Each triangle is a mounting tab. Two sit along the upper rail, one at the lower outer corner; check that they mirror left to right against your original housing.
- Circle with two dots – That is the harness connector at the inner rear corner. On both sides it tucks toward the center of the car, which means the pigtail orientation reverses between driver and passenger units.
- Dashed centerline – The axis of the lens. Use it as a reference when checking that a new assembly is seated level in the radiator support.
If you are replacing both sides as a matched set, compare tab spacing and prism direction against this layout before you tighten anything down.
Clear Headlight Fitment and Seal Checklist
Work through this list before you buy or bolt on a housing:
- Confirm model year and SL or VR4 trim before ordering.
- Match the OEM part number to driver or passenger side.
- Verify housing tab count and location against your original.
- Check connector pin count and harness length for plug-and-play fit.
- Inspect lens clear-coat and UV layer for clouding or peeling.
- Trace the perimeter gasket for continuous, unbroken contact.
- Confirm the butyl sealant bead is pliable and unbroken.
- Verify vent or breather provision to prevent condensation.
- Test-fit the housing before applying final sealant.
Seal and Gasket Inspection
Run a headlight seal check on a clean bench under bright light before installation. Trace the perimeter gasket with a fingernail and confirm uniform height; flattened ribs have taken a compression set and will not reseal. Look along the butyl tape bead in the sealant channel for gaps, hardening, or thin spots, then follow bond-line continuity where the lens meets the housing, since any void there becomes a path for water. The vent membrane should be clean, flexible, and free of sealant smear.
After a water test (low-pressure spray, ten minutes), dry the exterior and inspect the housing seam and bond line for droplets or trails.
Condensation that clears within 20-30 minutes of lamp operation is normal transient fogging. Persistent droplets, pooling, or repeat fogging after every wash points to a failed 3000GT headlight gasket, blocked venting, or an incomplete bond line. Replace the gasket instead of bridging a compromised seam with extra sealant; our 1995-1999 3000GT clear headlight assemblies are listed by side and trim.
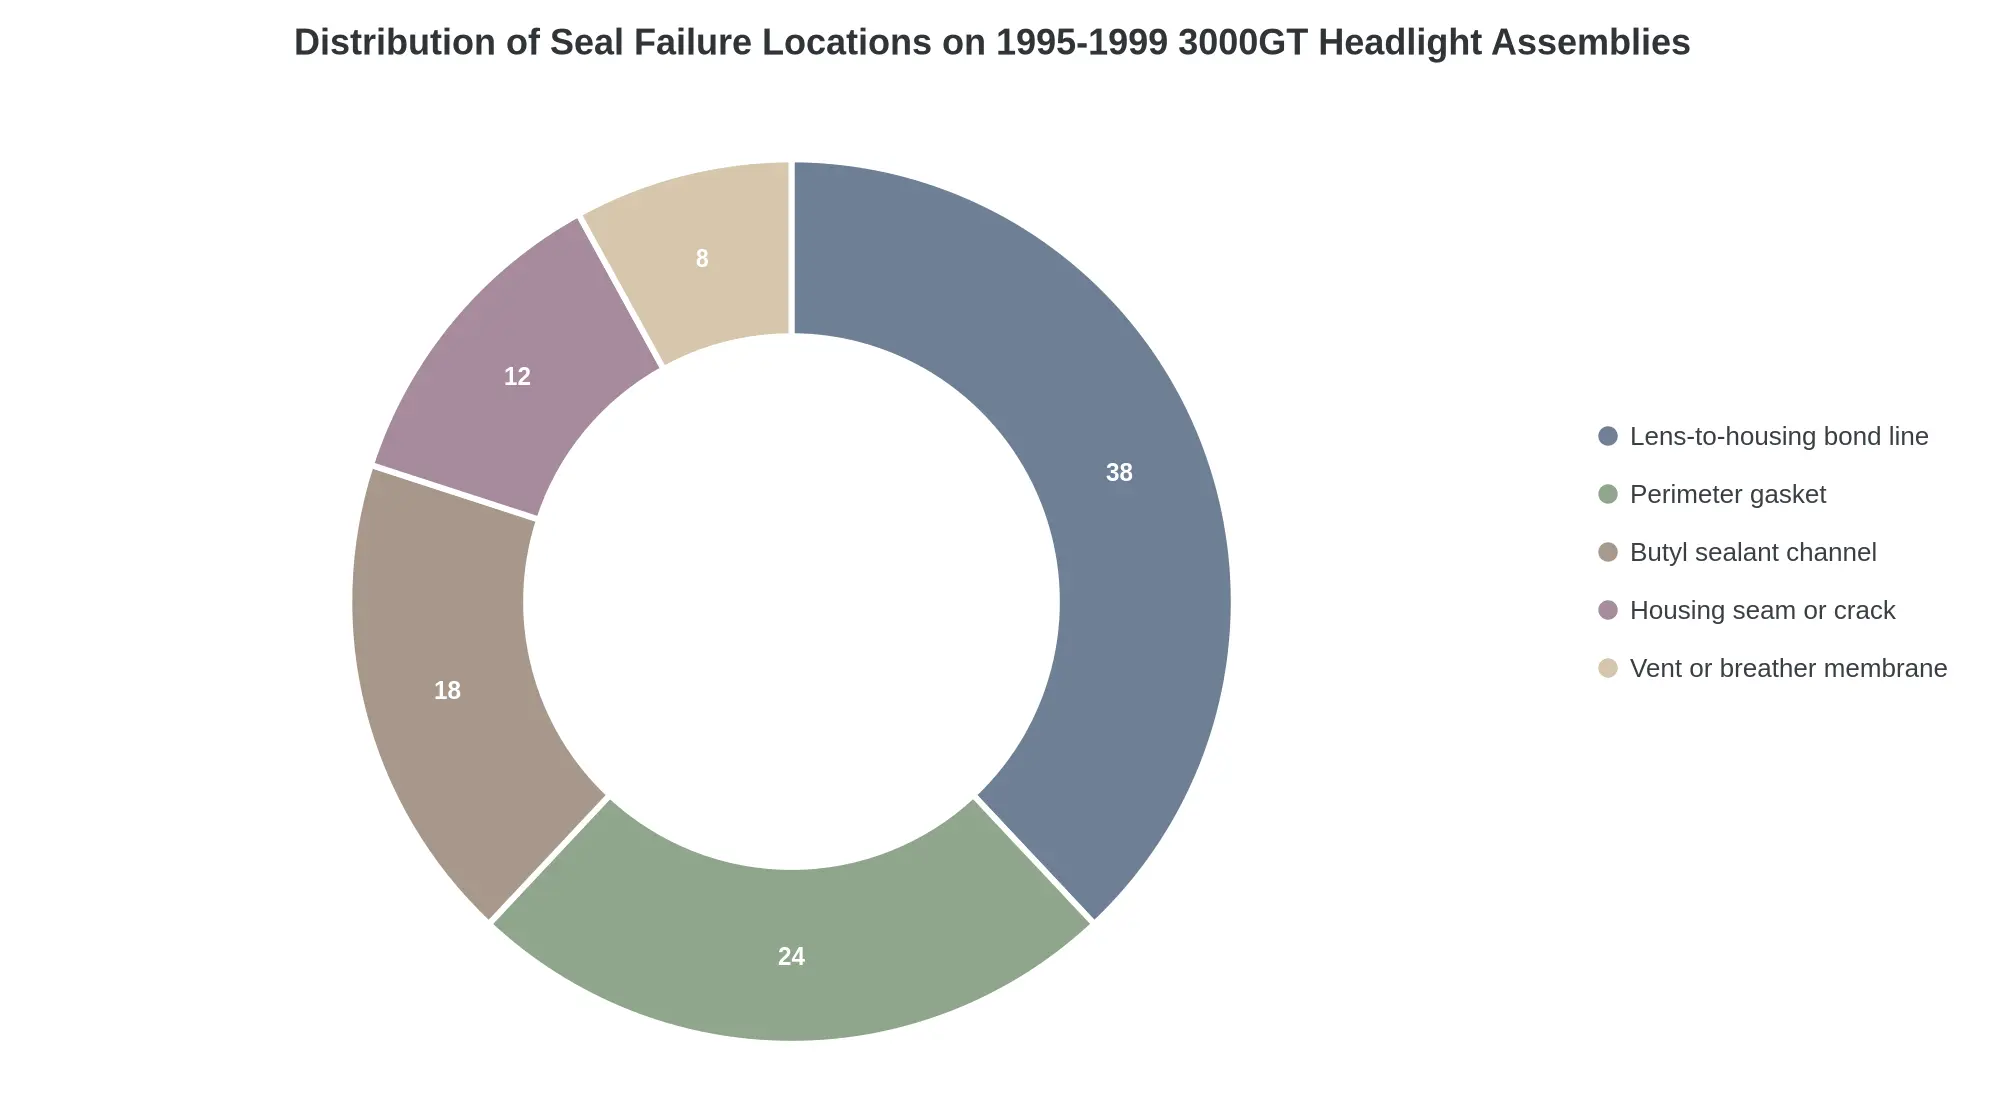
Figure 1. These percentage shares represent typical inspection findings on used 1995-1999 3000GT headlight assemblies, so use them to order the checks: lens-to-housing bond line and perimeter gasket first, then the butyl channel, housing seams, and vent membrane.
Installation and Post-Installation Verification
Work one side at a time. On 1995-1999 cars the assembly is held by four 10 mm fasteners.
- Disconnect the negative battery cable and remove the front fascia trim or bumper access panels to expose the mounting bolts.
- Unbolt the old assembly and withdraw it carefully to avoid scratching the fender.
- Transfer reusable gaskets, brackets, and mounting hardware to the new clear housing, replacing any cracked retainers.
- Inspect the butyl sealant channel and lay a fresh, continuous bead if the original is compressed or contaminated.
- Dry-fit the assembly and confirm mounting tabs, upper support, and harness connector align with SL or VR4 body points.
- Seat the housing and run each fastener in by hand until the assembly sits flush. No driver at this stage, and no compressed seal or distorted tabs.
- Tighten the fasteners in a cross pattern to the specified housing fastener torque, and stop there: over-tightening cracks the composite housing.
- Check that each tab meets its body boss squarely, then read panel gap along the fender and hood seam on both sides.
- Lower the hood slowly and confirm the lens clears the hood and bumper cover at full closure; reposition the housing if anything contacts.
- Plug in the harness, confirm circuit continuity at every connector, then test low beam, high beam, turn signal and marker circuits individually.
- Park on level ground facing a wall 25 ft (7.6 m) away and turn each beam aim adjuster until the cutoff lines match the factory pattern and sit level left to right.
- Apply low-pressure water around the lens and perimeter for several minutes, then inspect for droplets or fogging inside the glass.
Complete the full check on the second assembly before road testing.
Keeping the Seal Intact While You Work
Most of the failures at this stage come from four habits:
- Do not reuse butyl that has already been compressed or contaminated by grit; cut it out and lay a fresh continuous bead in the channel.
- Do not chase a panel gap by over-torquing fasteners. The seal takes the load first and the tabs crack next.
- Keep sealant off the vent membrane. A smeared or blocked vent pushes pressure through the bond line instead.
- Run the water test before the fascia trim goes back on, while you can still pull the housing without a second disassembly.
OEM vs Aftermarket Clear Lens Quality Evaluation
Judge an OEM or aftermarket headlight against one list, in priority order.
Tier 1 – sealing and protection: confirm DOT or SAE markings on the lens, verify UV-resistant clear coat coverage edge to edge (including the lower perimeter), and check the gasket material specification; molded EPDM or silicone outlasts generic foam.
Tier 2 – structure: confirm the lens is polycarbonate, not glass. Many assemblies marketed as clear headlight glass use polycarbonate lenses, so verify the material before purchase. Then assess lens thickness, optical clarity, mold-line and edge finish, plus housing material and tab rigidity at every mounting point; brittle tabs and thin lenses are where durability fails first.
Tier 3 – cosmetics. Coating and seals decide clear lens quality, so weight Tier 1 heaviest and compare the rest against a genuine assembly.
Seal Integrity and Fitment Outcomes by Headlight Assembly Type
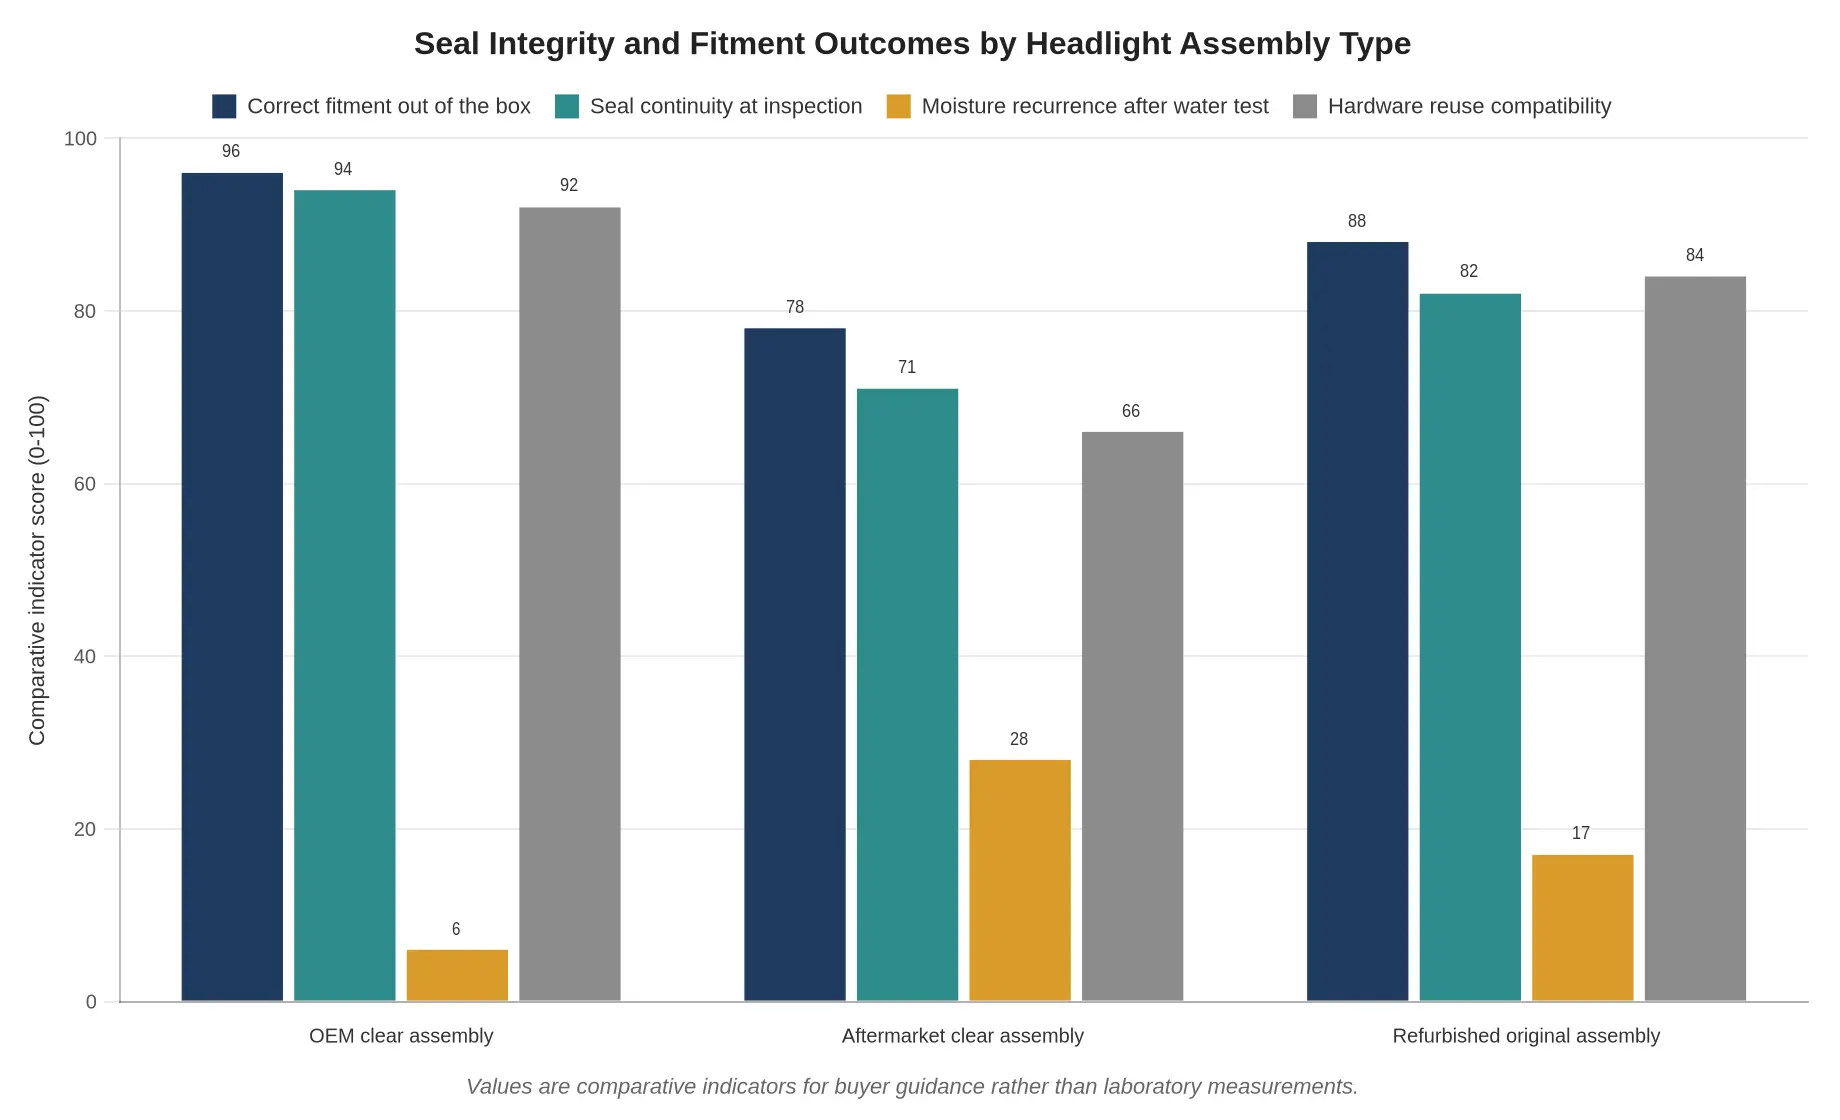
Values are comparative indicators for buyer guidance rather than laboratory measurements.
Reading the Four Bars
The chart scores each assembly type on the four checkpoints that decide whether a set of 1995-1999 3000GT clear headlights works on the car, not whether it photographs well.
| Measure | What It Tells You |
|---|---|
| Correct fitment out of the box | Whether the housing drops into the SL or VR4 fender pocket and aligns with the hood shut line without slotting or shimming |
| Seal continuity at inspection | Whether the lens-to-housing bead and the rear grommet seal run unbroken around the full perimeter |
| Moisture recurrence after water test | How often fogging or standing water returns after a controlled spray test – a lower number is better here |
| Hardware reuse compatibility | Whether original clips, adjuster screws, and side brackets transfer over without modification |
What the Spread Means for SL and VR4 Buyers
OEM clear assemblies lead on fitment, seal continuity, and hardware reuse, which follows from tooling cut to the original body dies. Refurbished original units come close because they start from genuine housings, but a resealed lens is only as good as the rebonding, so ask how the seal was made before you buy. Aftermarket clear units are the cheapest route, and the wider spread on moisture recurrence is the one to watch: a small gap at the lens edge becomes a fogged reflector after a wet season.
Before ordering, confirm driver and passenger side part numbers and run both trims and both sides through the checks above.
3000GT Clear Headlight FAQ
Are SL and VR4 clear headlight assemblies interchangeable?
No. The trims carry different part numbers with different suffixes, and the internals differ: VR4 housings use a projector low beam, SL housings a reflector bowl, with lens optics matched to each. Harness and ballast provisions differ as well. The housings are similar enough that this gets assumed, so confirm the suffix and the connector pinout, and check the listing against your VIN before ordering.
Do driver and passenger side lenses differ in geometry?
Yes. Each lens is molded asymmetrically with a side-specific beam cutoff and mounting tab orientation, so the halves are not reversible. A lens fitted to the wrong side produces a skewed pattern and a cutoff that cannot be aimed into spec.
Can the clear lens be replaced separately from the housing?
Replacement glass is sold for these cars, but fitting it is a rebonding job, not a bolt-on. The lens is bonded to the housing with a permanent urethane or butyl bead, and separating it usually breaks the mounting tabs and destroys the seal. Most units ship as complete assemblies; re-bonding is realistic only for experienced fabricators with proper primers.
What causes condensation after installing a clear headlight assembly?
A compromised seal: a weak lens-to-housing bond, a pinched or missing bulb O-ring, or a disconnected vent tube. Run a headlight seal check with a low-pressure water test before refitting trim, then reseat the gasket and reopen the vent path.
Should both sides be replaced at the same time?
Yes. Lenses age at the same rate, and an old unit next to a new one shows a color and cutoff mismatch that reads as repair work. A matched pair also keeps aim symmetrical and makes adjustment simpler.
Does beam aim need adjustment after installation?
Yes. New housings rarely arrive pre-aimed, so set the cutoff on a level wall at 25 feet with the car at curb weight. Turn the vertical and horizontal screws until both cutoffs align to DOT spec.
Selection Checklist: Match All Four Variables
Work the sequence in order: trim, side, part number, seal components, then install and verify. Clear headlight glass selection on the 1995-1999 3000GT depends on those four variables rather than appearance, so check each clear driver and passenger side headlight glass listing against your SL or VR4 build before ordering. If exterior panels are part of the same job, the Pit Fighter carbon fiber hood is the companion piece, once fitment is documented.